| Font Awesome is published under the SIL OFL 1.1 license. The code presented in this post was simplified (completeness, robustness, etc.) and should not be used outside of this context. This post is based on the version 4.7.0 of Font Awesome. |
A basic example
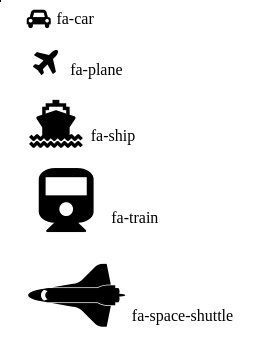
Font Awesome, the iconic font and CSS toolkit, gives us icons that can be easily customized — size, color, drop shadow — with the sole power of CSS. No JavaScript is required and icons scale smoothly on any devices. Here is a small HTML document that uses the main features to display of list of transportation icons:
<!doctype html>
<html>
  <head>
    <title>Font Awesome Demo</title>
    <link rel="stylesheet"
          href="font-awesome/css/font-awesome.min.css"> (1)
  </head>
  <body>
    <ul>
      <li><i class="fa fa-car fa-lg fa-fw"></i> fa-car</li> (2)
      <li><i class="fa fa-plane fa-2x fa-fw"></i> fa-plane</li>
      <li><i class="fa fa-ship fa-3x fa-fw"></i> fa-ship</li>
      <li><i class="fa fa-train fa-4x fa-fw"></i> fa-train</li>
      <li><i class="fa fa-space-shuttle fa-5x fa-fw"></i> fa-space-shuttle</li>
    </ul>
  </body>
</html>| 1 | The only dependency is this stylesheet |
| 2 | Add the tag <i> to use any icon and customize it using CSS classes |
Here is the output:
Having this working example, we will now turn our attention to the inner working of Font Awesome and implement a lightweight implementation of the library.
A first look under the hood
As the name might suggest, Font Awesome is nothing more than a new font. But unlike other fonts, Font Awesome does not bother to design a new face for the letter ‘A’ or other common characters and exploit a subtlety of the Unicode Character Table to add new symbols:
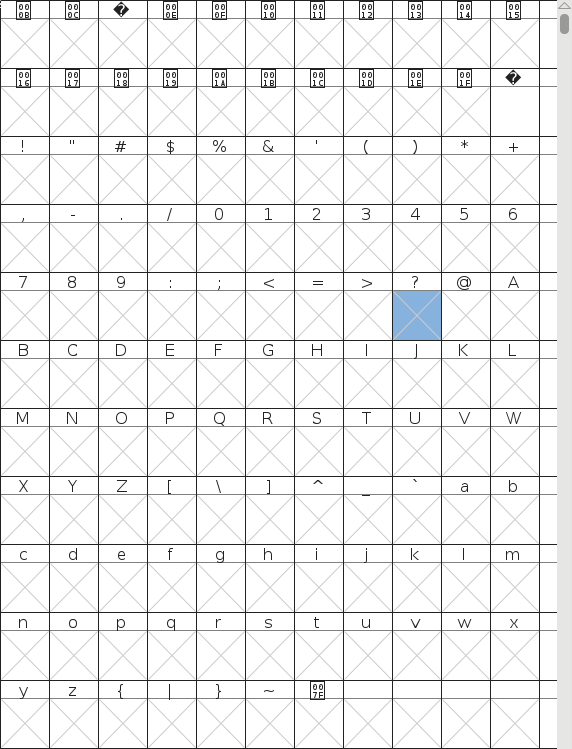
In Unicode, the Private Use Areas (PUA) are three ranges of code points (U+E000–U+F8FF in the BMP, and in planes 15 and 16) that, by definition, will not be assigned characters by the Unicode Consortium. The code points in these areas cannot be considered as standardized characters in Unicode itself. They are intentionally left undefined so that third parties may define their own characters without conflicting with Unicode Consortium assignments.
Private Use Area
Let’s take an example:
<i class="fa fa-car"></i>To replace an HTML tag by an icon, a common solution has always been to use the CSS property background-image like this:
i.fa-car {
  background-image: url("car.gif");
  /* + width, height, etc. */
}
But there are many disadvantages to this solution. First, each icon requires a new file to download. CSS sprites could be used to avoid that. Second, bitmap images (jpeg, png, etc.) are not scalable. If we need to include the same picture with different sizes, we need several different files. This workaround, however, lengthen the load time of the page. Font Awesome solve these problems with an elegant solution based on the CSS content property.
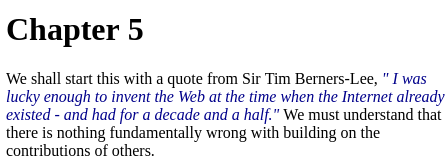
The content CSS property is used with the ::before and ::after pseudo-elements to generate content in an element. This could be a raw text, an url, a quote character, or even an incremental counter. Here is an example from the Mozilla documentation:
<h1>5</h1>
<p> We shall start this with a quote from Sir Tim Berners-Lee,
    <q>
        I was lucky enough to invent the Web at the time when
        the Internet already existed - and had for a decade and a half.
    </q>
    We must understand that there is nothing fundamentally wrong
    with building on the contributions of others.
</p>
q {
color: #00008B;
font-style: italic;
}
q::before { content: open-quote }
q::after { content: close-quote }
h1::before { content: "Chapter "; }Output:
Let’s now check how Font Awesome use this property. Here is the definition of the CSS classes fa and fa-car used above:
.fa {
  display: inline-block;
  font-family: 'FontAwesome';
}
.fa-car:before {
  content: "\f1b9";
}
Font Awesome works by prefixing a special character to the tag <i> - the tag displaying nothing itself and only used to exploit the CSS :before pseudo-element. The syntax \f1b9 looks obscure but only represent a Unicode number. For example, the two following snippets are equivalent:
.fa-car:before {
  content: 'car';
}
.fa-car:before {
  content: '\0063\0061\0072';
}
As mentioned previously the character f1b9 is present in the special range reserved for third-party tools. For the browser to display something useful, we need to configure a font that define this character. This is the role of the font-family property initialized to the value FontAwesome. This font is defined in the same file using the @font-face rule:
@font-face {
  font-family: 'FontAwesome';
  src: url('../fonts/fontawesome-webfont.eot?v=4.7.0');
  src: url('../fonts/fontawesome-webfont.eot?#iefix&v=4.7.0')
         format('embedded-opentype'),
       url('../fonts/fontawesome-webfont.woff2?v=4.7.0') format('woff2'),
       url('../fonts/fontawesome-webfont.woff?v=4.7.0') format('woff'),
       url('../fonts/fontawesome-webfont.ttf?v=4.7.0') format('truetype'),
       url('../fonts/fontawesome-webfont.svg?v=4.7.0#fontawesomeregular')
         format('svg');
}
The
@font-faceCSS at-rule allows authors to specify online fonts to display text on their web pages. By allowing authors to provide their own fonts, @font-face eliminates the need to depend on the limited number of fonts users have installed on their computers.
@font-face
Having defined the CSS rule, we could easily use it to add icons without using any of the CSS classes defined by Font Awesome (Caution: not a good idea in term of code maintainability):
<!doctype html>
<html>
<head>
<title>Font Awesome Demo</title>
<link rel="stylesheet" href="font-awesome-4.7.0/css/font-awesome.min.css">
<style>
p {
font-family: 'FontAwesome'; (1)
}
</style>
</head>
<body>
<p>This is  a  space shuttle.</p>
</body>
</html>Output:

If we want to go deeper into Font Awesome, we need to go further on the subject of font creation. This is the objective of the next part.
Custom Font Creation
Basics
To begin, we will open the provided font with the same tool used by the team Font Awesome, FontForge. To install, check the official documentation. On Ubuntu/Debian, run the following commands:
sudo add-apt-repository ppa:fontforge/fontforge;
sudo apt-get update;
sudo apt-get install fontforge;
Once installed, launch the application by running the command $ fontforge. When ready, the application asks us to select the font file. Go to the Font-Awesome directory fonts/ and select the file FontAwesome.otf (other formats could be generated using FontForge from this file.)
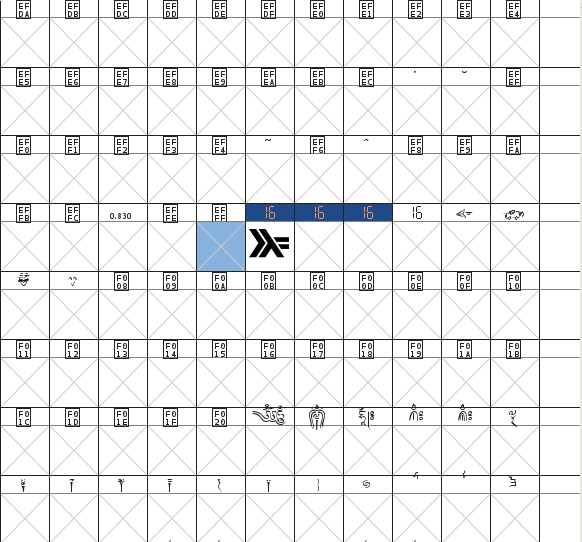
The first Unicode numbers correspond to the same character as the ASCII encoding. As mentioned previously, no icons is defined for these characters — the browser fallbacks to other fonts when a character could not be found in the selected font.
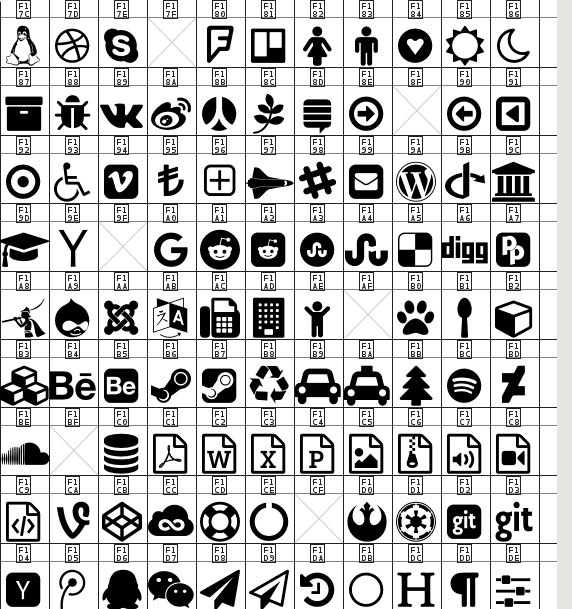
If we scroll to the bottom of the list, we finally found the Font Awesome icons:
A new font
Designing a new type is visually complex as well as highly technical. Even if it is easier to begin making type when using free tools like FontForge, the tasks remains challenging. Just have a look at the extensive FontForge documentation to make your own opinion. In this blog post, we will use a shortcoming. FontForge lets users who may be more comfortable designing their glyph outlines in some other vector design program (Illustrator, FreeHand, Inkscape, etc.), import them directly into FontForge. We are even taking it a step further: we will directly import a SVG file downloaded from the Internet. So, open your browser, go to Google Images, and enter filetype:svg <some keywords>. Download a picture of your choice. I choose the logo of the Haskell language ![]() .
.
Then,
-
Check FontForge is running. Launch it as before otherwise.
-
Click
File>Opento create a new font. An empty grid appears. -
Click
Encoding>Reencode>ISO 10646-1 (Unicode, BMP)to use the same encoding as Font Awesome. -
Scroll until you reach the Unicode number
F000(in case of doubt, right-click on a glyph >Glyph Info…, the Unicode value is showed at the top of the dialog) -
Double-click on the glyph
F000to open the glyph editor.
-
Click
File>Importand select your downloaded picture.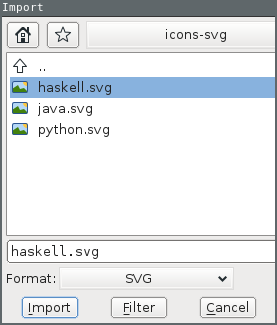
-
Be sure the glyph outline seems all right.
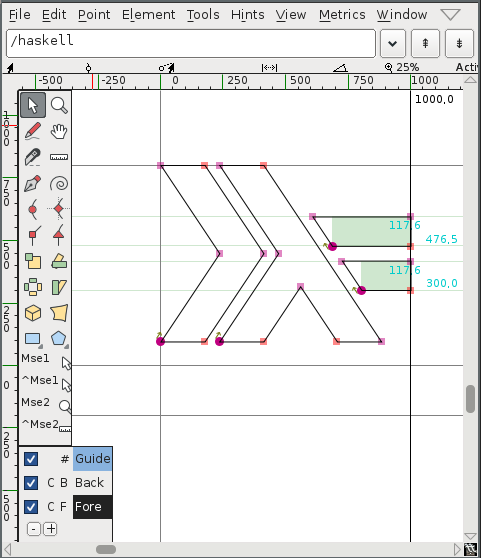
-
Click
File>Closeto close the glyph editor. -
The imported glyph should appear in the grid.
-
Click
File>Generate Fonts…to export our new font.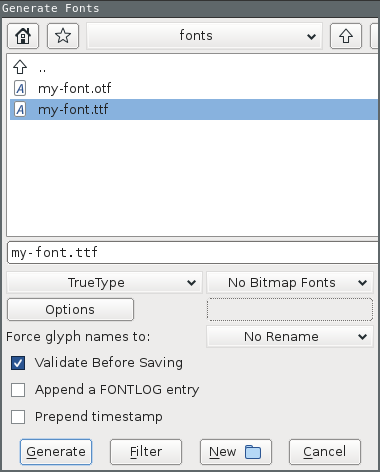
Note: Be sure to use an output format supported by your browser. On my Debian machine with Google Chrome, I choose the True Type format and named the file
my-font.ttf. If FontForge warns you about potential errors, try ignoring the warnings. -
Close FontForge.
Test the font
We create a new file new-font.css and declare the font.
@font-face {
  font-family: 'MyFont';
  src: url('my-font.ttf') format('truetype');
}
We declare the equivalent of the classes fa and fa-car. We use the prefix mf, that stands for “My font”.
.mf {
  font-family: 'MyFont';
}
.mf-haskell:before {
  content: '\f000';
}
Create a new HTML document importing this stylesheet and declaring an element having the class mf-haskell:
<!doctype html>
<html>
  <head>
    <title>Font Awesome Demo</title>
    <link rel="stylesheet" href="my-font.css">
  </head>
  <body>
    <i class="mf mf-haskell"></i> mf-haskell
  </body>
</html>
Output:

Customize the icons
Icons added by Font Awesome can be easily customized — size, color, rotation, etc. To do so, Font Awesome uses basic CSS declarations. Let’s try some of them.
Colored icons
As we have seen, icons are just plain text. So, the CSS color property is working as usual:
i {
  color: DarkSlateBlue;
}
Output:
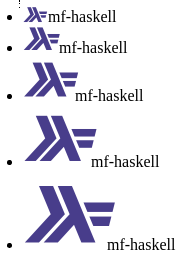
Larger icons
To increase icon sizes relative to their container with Font Awesome, we use the fa-lg (33% increase), fa-2x, fa-3x, fa-4x, or fa-5x classes.
<i class="fa fa-camera-retro fa-lg"></i> fa-lg
<i class="fa fa-camera-retro fa-2x"></i> fa-2x
<i class="fa fa-camera-retro fa-3x"></i> fa-3x
<i class="fa fa-camera-retro fa-4x"></i> fa-4x
<i class="fa fa-camera-retro fa-5x"></i> fa-5x
As icons are just plain text, we could easily support this feature playing with the font-size property.
.mf-lg {
  font-size: 1.33333333em;
}
.mf-2x {
  font-size: 2em;
}
.mf-3x {
  font-size: 3em;
}
.mf-4x {
  font-size: 4em;
}
.mf-5x {
  font-size: 5em;
}
We update our HTML document to use these classes:
<ul>
  <li><i class="mf mf-haskell mf-lg"></i></li>
  <li><i class="mf mf-haskell mf-2x"></i></li>
  <li><i class="mf mf-haskell mf-3x"></i></li>
  <li><i class="mf mf-haskell mf-4x"></i></li>
  <li><i class="mf mf-haskell mf-5x"></i></li>
</ul>
Output:
Fixed width icons
To make all icons having the same width, we just need to define a fixed width while centering the icon inside the CSS box.
.mf-fw {
  width: 1.28571429em;
  text-align: center;
}
Rotated icons
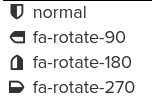
To arbitrarily rotate icons with Font Awesome, we use the fa-rotate-* classes.
<i class="fa fa-shield"></i> normal<br>
<i class="fa fa-shield fa-rotate-90"></i> fa-rotate-90<br>
<i class="fa fa-shield fa-rotate-180"></i> fa-rotate-180<br>
<i class="fa fa-shield fa-rotate-270"></i> fa-rotate-270<br>
Output:
Using CSS 3 transformations, this feature is implemented in a few lines of code.
.mf-rotate-90 {
transform: rotate(90deg);
}
.mf-rotate-180 {
transform: rotate(180deg);
}
.mf-rotate-270 {
transform: rotate(270deg);
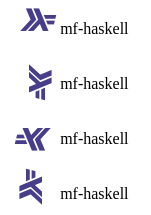
}We update the HTML document to exploit the last two sections:
<ul>
  <li><i class="mf mf-haskell mf-2x mf-fw"></i> mf-haskell</li>
  <li><i class="mf mf-haskell mf-2x mf-fw mf-rotate-90"></i> mf-haskell</li>
  <li><i class="mf mf-haskell mf-2x mf-fw mf-rotate-180"></i> mf-haskell</li>
  <li><i class="mf mf-haskell mf-2x mf-fw mf-rotate-270"></i> mf-haskell</li>
</ul>
Output:
This ends the part devoted to the icons customization and this post too.
|
Congratulations!
We have build a minimal but functional version of Font Awesome (with just one icon but that’s a good start!). If you want to go further:
|

About the author
Julien Sobczak works as a software developer for Scaleway, a French cloud provider. He is a passionate reader who likes to see the world differently to measure the extent of his ignorance. His main areas of interest are productivity (doing less and better), human potential, and everything that contributes in being a better person (including a better dad and a better developer).
Read Full Profile