|
There is a newer version of this article, Anki Scripting for Non-Programmers. This new post is shorter and is a great introduction to the subject. You can come back to this older article if you want more details about Anki and/or learn about some advanced use cases like converting an ebook into flashcards. |
A look inside the Anki model
This is the first part in this lengthy article on Anki and how to use it to create your flashcards programmatically. We will begin by presenting the inner model of Anki, how the different classes interact and when the database is updated when we are using the desktop application. In the next part, we will be doing the same thing without using the GUI, using only the internal API of Anki. We will also cover how to script Anki to bulk load flashcards, useful for example when you need to learn the 5000 most common words in a new language. Let’s get started!
Anki Reverse Engineering
A good start is to begin by cloning the official repository of Anki:
$ git clone https://github.com/dae/anki.git
When the clone of the repository is finished, enter into this new directory anki et let’s see how the code is organized.
Project organization
Not all directories are pertinent for our analysis. Here is an annotated description of each folder:
anki/          -> Main Anki logic. Contains the model and the SRS algorithm
  | importing/ -> Logic to import various file formats including Anki1, Anki2,
                  Supermemo (a paid Anki-like tool)
  | template/  -> Anki uses a modified version of Pystache to provide
                  Mustache-like syntax.
                  The templating is using to render flashcard's content.
aqt/           -> Contains Python scripts using PyQT to build the widgets,
                  dialogs and other graphical components
                  that composed the Anki Desktop Application.
designer/      -> Contains PyQT 4 UI files created using Qt Designer.
                  These files are generated using the command pyuic4.
tests/         -> Unit tests based on the framework Nose
  | support/   -> Fixtures (anki and anki2 files, PNG media file, ...)
tools/         -> Simple shell scripts to launch the tests or the UI generation
Makefile       -> Basic build script to install or uninstall Anki
                  (create folders and move files using mkdir
                  and mv Unix commands)
The two most important folders are anki and aqt: the first contains all the core logic behind Anki (model, SRS algorithm) while the second contains all the code concerning the Desktop GUI, using the QT library.
When you click on the Anki icon, the script runanki.py is executed. This script does not do much except launching the GUI:
import aqt
aqt.run()|
Where are stored my cards?
Anki stores your decks in the folder associated with your profile. This folder stores all of your Anki data in a single location, to make backups easy. By default, Anki uses the folder ~/Documents/Anki under your home directory: aqt/profiles.py
To tell Anki to use a different location, please see: https://ankisrs.net/docs/manual.html#startupopts This could be very useful when you experiment with Anki to avoid corrupting our data! |
Now, we know where is stored our database, let’s inspect the different files present under this directory.
~/Documents/Anki
 |- addons: a list of third-party add-ons that you can install directly
 |          from Anki > Tools > Add-ons > ...
 |          On fresh install, this folder is empty as no add-ons are installed
 |- User 1: A folder named after your profile name
 |   |- backups: The most recent backups automatically created by Anki
 |   |   |       (the last 30 backups are saved by default)
 |   |   |- backup-88.apkg
 |   |   | ...
 |   |   \- backup-117.apkg
 |   |- collection.media: The list of media included in the cards
 |   |   |- hello.png
 |   |   \- ... (hundreds of images, sounds for my personal folder)
 |   |- collection.anki2: A SQLite database containing all
 |   |                    of your decks, cards, ...
 |   |- collection.anki2-journal: A binary file
 |   |- collection.log: A log file containing the list of actions
 |   |                  (method calls) with their timestamp
 |   |- collection.media.db2: An SQLite database listing all of the media
 |   \- deleted.txt: A log of card deletions acting as the trash bin.
 |                   The file is always appended by Anki but never read directly
 \- prefs.db: A SQLite database to contains your preferences.
The most important files are clearly the SQLite databases (collection.anki2 and collection.media.db2).
|
What is SQLite?
SQLite is a self-contained, zero-configuration, transactional SQL database engine. SQLite is not directly comparable to client/server SQL database engines such as MySQL, Oracle, PostgreSQL, or SQL Server since SQLite is trying to solve a different problem. Client/server SQL database engines strive to implement a shared repository of enterprise data. They emphasis scalability, concurrency, centralization, and control. SQLite strives to provide local data storage for individual applications and devices. SQLite emphasizes economy, efficiency, reliability, independence, and simplicity. So, SQLite does not compete with client/server databases. SQLite competes with Refer to the official documentation for more information. |
-
A anki2 file is a DB2 database archive (SQLite).
-
A apkg file is just an archive (you could use 7zip or your favorite decompression utility to see its content) containing the anki2 file that we just described and a file media. This media file is a simple text file containing an empty JSON object. As mentioned inside the Preferences dialog, Medias are not backed up. We need to create a periodic backup of our Anki folder to be safe. If you use AnkiWeb, our media are already synchronized in the cloud but be careful, decks stored in your account may be archived and eventually deleted if they are not accessed for 3 months or longer. If you are not planning to study for a few months, the manual backup of the content on your own computer is still required.
To understand Anki, we need at least a basic understanding of how the data are organized. Let’s inspect the database to determine its schema and the different tables.
Anki Database Schema
The most complete "official" description of the database schema is available on GitHub under the Android application source: https://github.com/ankidroid/Anki-Android/wiki/Database-Structure
We will start from this description and complete where information is missing.
|
How to inspect the Anki database?
|
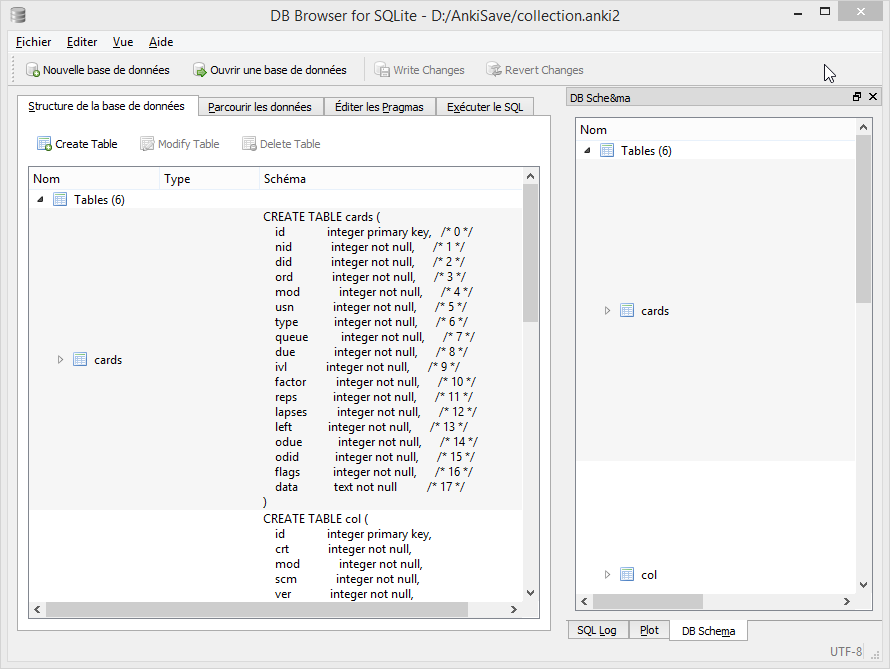
What follows is the complete annotated schema. You could safely skim this part and use it as a reference. Note: the model in Python files is rarely documented.
-- Cards are what you review.
-- There can be multiple cards for each note, as determined by the Template.
CREATE TABLE cards (
    id              integer primary key,
    -- The card id, could be generated randomly
    -- Anki uses the epoch milliseconds of when the card was created

    nid             integer not null,
    -- nodes.id

    did             integer not null,
    -- deck id (available in col table)

    ord             integer not null,
    -- ordinal : identifies which of the card templates it corresponds to
    -- valid values are from 0 to num templates - 1
    -- see the model JSON representation (field tmpls)

    mod             integer not null,
    -- modification time as epoch seconds

    usn             integer not null,
     -- update sequence number: used to do diffs when syncing with AnkiWeb
     -- value of -1 indicates changes that need to be pushed to server.
     --  usn < server usn indicates changes that need to be pulled from server.

    type            integer not null,
    -- 0=new, 1=learning, 2=due

    queue           integer not null,
    -- Same as type, but -1=suspended, -2=user buried, -3=sched buried

    due             integer not null,
    -- Due is used differently for different card types:
    --   new queue: note id or random int
    --   due/rev queue: integer day, relative to the collection's creation time
    --   learning queue: integer timestamp

    ivl             integer not null,
    -- interval (used in SRS algorithm). Negative = seconds, possitive = days

    factor          integer not null,
    -- factor (used in SRS algorithm)

    reps            integer not null,
    -- The number of reviews (used in SRS algorithm)

    lapses          integer not null,
    -- The number of times the card went from a "was answered correctly"
    -- to "was answered incorrectly" state (used in SRS algorithm)

    left            integer not null,
    -- reps left till graduation (used in SRS algorithm)

    odue            integer not null,
    -- original due: only used when the card is currently in filtered deck
    -- (used in SRS algorithm)

    odid            integer not null,
    -- original did: only used when the card is currently in filtered deck
    -- (used in SRS algorithm)

    flags           integer not null,
    -- currently unused (always 0)

    data            text not null
    -- currently unused (always empty string)
)
-- The collection (contains one or many decks)
-- col contains a single row that holds various information about the collection
CREATE TABLE col (
id integer primary key,
-- An integer identifier (1, 2, 3,...)
-- arbitrary number since there is only one row
crt integer not null,
-- Creation date, timestamp in seconds
-- (Ex: 1415070000 for the 2014, 4th November)
mod integer not null,
-- Modification date, timestamp in milliseconds.
-- Last time you create a new card or study our flashcards.
-- (Ex: 1466770067192 for the 2016, 24th June at 14:07)
scm integer not null,
-- Last schema modification date, timestamp in milliseconds
-- If server scm is different from the client scm a full-sync is required
ver integer not null,
-- Schema version number of the record.
-- Should be the same as constant SCHEMA_VERSION defined in anki/consts.py
dty integer not null,
-- No longer used. Use 0.
usn integer not null,
-- The update sequence number
ls integer not null,
-- Last sync timestamp in ms.
conf text not null,
-- json object containing configuration options that are synced
-- see below
models text not null,
-- json array of json objects containing the models (aka Note types)
-- see below
decks text not null,
-- json array of json objects containing the deck
-- see below
dconf text not null,
-- json array of json objects containing the deck options
-- see below
tags text not null
-- a cache of tags used in the collection (probably for autocomplete etc)
-- see below
)Where:
-
Field
confcontains various deck configuration options used by the SRS algorithm:
{
    "activeDecks": [1],
    "curDeck": 1,
    "newSpread": 0,
    "collapseTime": 1200,
    "timeLim": 0,
    "estTimes": true,
    "dueCounts": true,
    "curModel": null,
    "nextPos": 1,
    "sortType": "noteFld",
    "sortBackwards": false,
    "addToCur": true
}
Whose definition follows:
{
    "activeDecks": "List of active decks",
    "curDeck": "decks.id of the deck to highlight when opening Anki",
    "newSpread": "whether new cards should be mixed with reviews, \
        or shown first or last: NEW_CARDS_DISTRIBUTE(0), NEW_CARDS_LAST(1),
        NEW_CARDS_FIRST(2)",
    "collapseTime": "Used in SRS algorithm",
    "timeLim": "Timeboxing limit when reviewing cards (0 => disabed)",
    "estTimes": "Unused",
    "dueCounts": "Unused",
    "curModel": "Default model for new cards",
    "nextPos": "Select max(due)+1 from cards where type = 0",
    "sortType": "On which columns to sort when retrieving cards?",
    "sortBackwards": "Should the order be reversed?",
    "addToCur": "Add new to currently selected deck?"
}-
Field
modelscontains the JSON representation of a ModelManager (anki/models.py):
{
   "1355577990691": {
      "vers": [],
      "name": "1. Minimal Pairs",
      "tags": [],
      "did": 1382740944947,
      "usn": 336,
      "req": [
         [0,"any",[0,1,2,3,4,6,7]],
         [1,"any",[0,2,3,4,5,6,7]],
         [2,"all",[8]],
         [3,"all",[8]],
         [4,"all",[8,12]],
         [5,"all",[8,12]]
      ],
      "flds": [
         { "name": "Word 1",                    "media":[], "sticky":false, "rtl":false, "ord":0,  "font":"Arial", "size":20 },
         { "name": "Recording 1",               "media":[], "sticky":false, "rtl":false, "ord":1,  "font":"Arial", "size":20 },
         { "name": "Word 1 IPA",                "media":[], "sticky":false, "rtl":false, "ord":2,  "font":"Arial", "size":20 },
         { "name": "Word 1 English",            "media":[], "sticky":false, "rtl":false, "ord":3,  "font":"Arial", "size":20 },
         { "name": "Word 2",                    "media":[], "sticky":false, "rtl":false, "ord":4,  "font":"Arial", "size":20 },
         { "name": "Recording 2",               "media":[], "sticky":false, "rtl":false, "ord":5,  "font":"Arial", "size":20 },
         { "name": "Word 2 IPA",                "media":[], "sticky":false, "rtl":false, "ord":6,  "font":"Arial", "size":20 },
         { "name": "Word 2 English",            "media":[], "sticky":false, "rtl":false, "ord":7,  "font":"Arial", "size":20 },
         { "name": "Word 3",                    "media":[], "sticky":false, "rtl":false, "ord":8,  "font":"Arial", "size":20 },
         { "name": "Recording 3",               "media":[], "sticky":false, "rtl":false, "ord":9,  "font":"Arial", "size":20 },
         { "name": "Word 3 IPA",                "media":[], "sticky":false, "rtl":false, "ord":10, "font":"Arial", "size":20 },
         { "name": "Word 3 English",            "media":[], "sticky":false, "rtl":false, "ord":11, "font":"Arial", "size":20 },
         { "name": "Compare Word 2 to Word 3?", "media":[], "sticky":false, "rtl":false, "ord":12, "font":"Arial", "size":20 }
      ],
      "sortf": 0,
      "tmpls": [
         {
            "name": "Card 1",
            "qfmt": "<i>Do you hear</i><br><br>\n<div class=container>\n<div class=box>{{Word 1}}\n<span class=ipa>[{{Word 1 IPA}}]</span>\n<span class=translation>{{Word 1 English}}</span>\n</div>\n\n<div class=or><i> or </i></div>\n\n<div class=box>{{Word 2}}\n<span class=ipa>[{{Word 2 IPA}}]</span>\n<span class=translation>{{Word 2 English}}</span>\n</div>\n</div>\n<br>{{Recording 1}} ",
            "did": null,
            "bafmt": "",
            "afmt": "{{FrontSide}}\n\n<hr id=answer>\n\nYou heard: <div class=box>{{Word 1}}</div></b><br><br>\n\n{{Recording 1}}",
            "ord": 0,
            "bqfmt": ""
         },
         {
            "name": "Card 2",
            "qfmt": "<i>Do you hear</i><br><br>\n<div class=container>\n<div class=box>{{Word 1}}\n<span class=ipa>[{{Word 1 IPA}}]</span>\n<span class=translation>{{Word 1 English}}</span>\n</div>\n\n<div class=or><i> or </i></div>\n\n<div class=box>{{Word 2}}\n<span class=ipa>[{{Word 2 IPA}}]</span>\n<span class=translation>{{Word 2 English}}</span>\n</div>\n</div>\n<br>{{Recording 2}} \n\n",
            "did": null,
            "bafmt": "",
            "afmt": "{{FrontSide}}\n\n<hr id=answer>\n\nYou heard: <div class=box>{{Word 2}}</div></b><br><br>\n{{Recording 2}}\n  \n",
            "ord": 1,
            "bqfmt": ""
         },
         {
            "name": "Card 3",
            "qfmt": "{{#Word 3}}\n<i>Do you hear</i><br><br>\n<div class=container>\n<div class=box>{{Word 1}}\n<span class=ipa>[{{Word 1 IPA}}]</span>\n<span class=translation>{{Word 1 English}}</span>\n</div>\n\n<div class=or><i> or </i></div>\n\n<div class=box>{{Word 3}}\n<span class=ipa>[{{Word 3 IPA}}]</span>\n<span class=translation>{{Word 3 English}}</span>\n</div>\n</div>\n<br>{{Recording 3}} \n{{/Word 3}}",
            "did": null,
            "bafmt": "",
            "afmt": "{{FrontSide}}\n\n<hr id=answer>\n\nYou heard: <div class=box>{{Word 3}}</div></b><br><br>\n\n{{Recording 3}}",
            "ord": 2,
            "bqfmt": ""
         },
         {
            "name": "Card 4",
            "qfmt": "{{#Word 3}}\n<i>Do you hear</i><br><br>\n<div class=container>\n<div class=box>{{Word 1}}\n<span class=ipa>[{{Word 1 IPA}}]</span>\n<span class=translation>{{Word 1 English}}</span>\n</div>\n\n<div class=or><i> or </i></div>\n\n<div class=box>{{Word 3}}\n<span class=ipa>[{{Word 3 IPA}}]</span>\n<span class=translation>{{Word 3 English}}</span>\n</div>\n</div>\n<br>{{Recording 1}} \n{{/Word 3}}",
            "did": null,
            "bafmt": "",
            "afmt": "{{FrontSide}}\n\n<hr id=answer>\n\nYou heard: <div class=box>{{Word 1}}</div></b><br><br>\n\n{{Recording 1}}",
            "ord": 3,
            "bqfmt": ""
         },
         {
            "name": "Card 5",
            "qfmt": "{{#Compare Word 2 to Word 3?}}\n{{#Word 3}}\n<i>Do you hear</i><br><br>\n<div class=container>\n<div class=box>{{Word 2}}\n<span class=ipa>[{{Word 2 IPA}}]</span>\n<span class=translation>{{Word 2 English}}</span>\n</div>\n\n<div class=or><i> or </i></div>\n\n<div class=box>{{Word 3}}\n<span class=ipa>[{{Word 3 IPA}}]</span>\n<span class=translation>{{Word 3 English}}</span>\n</div>\n</div>\n<br>{{Recording 2}} \n{{/Word 3}}\n{{/Compare Word 2 to Word 3?}}",
            "did": null,
            "bafmt": "",
            "afmt": "{{FrontSide}}\n\n<hr id=answer>\n\nYou heard: <div class=box>{{Word 2}}</div></b><br><br>\n\n{{Recording 2}}",
            "ord": 4,
            "bqfmt": ""
         },
         {
            "name": "Card 6",
            "qfmt": "{{#Compare Word 2 to Word 3?}}\n{{#Word 3}}\n<i>Do you hear</i><br><br>\n<div class=container>\n<div class=box>{{Word 2}}\n<span class=ipa>[{{Word 2 IPA}}]</span>\n<span class=translation>{{Word 2 English}}</span>\n</div>\n\n<div class=or><i> or </i></div>\n\n<div class=box>{{Word 3}}\n<span class=ipa>[{{Word 3 IPA}}]</span>\n<span class=translation>{{Word 3 English}}</span>\n</div>\n</div>\n<br>{{Recording 3}} \n{{/Word 3}}\n{{/Compare Word 2 to Word 3?}}",
            "did": null,
            "bafmt": "",
            "afmt": "{{FrontSide}}\n\n<hr id=answer>\n\nYou heard: <div class=box>{{Word 3}}</div></b><br><br>\n\n{{Recording 3}}",
            "ord": 5,
            "bqfmt": ""
         }
      ],
      "mod": 1466769421,
      "latexPost": "\\end{document}",
      "type": 0,
      "id": 1355577990691,
      "css": ".card {\n font-family: arial;\n font-size: 20px;\n text-align: center;\n color: black;\n background-color: white;\n}\n.box {\n display:inline-block;\nborder:2px solid black;\npadding:5px;\nfont-size:1.4em\n}\n\n.ipa {\nfont-size:0.7em;\ndisplay:block;\ncolor:blue;\npadding:0 0 5px 0px;\n}\n\n.container {\nborder:0px solid;\ndisplay:table;\nmargin:auto;\n}\n\n.or {\ndisplay:table-cell;\nvertical-align:middle;\npadding:0 10px\n}\n.translation {\nfont-size:0.6em;\ndisplay:block;\ncolor:gray;\n}\n",
      "latexPre":"\\documentclass[12pt]{article}\n\\special{papersize=3in,5in}\n\\usepackage{amssymb,amsmath}\n\\pagestyle{empty}\n\\setlength{\\parindent}{0in}\n\\begin{document}\n"
   }
}
Whose definition follows:
{
    "css": "CSS, shared for all templates",
    "did":
        "Long specifying the id of the deck that cards are added to by default",
    "flds": [
       "JSONArray containing object for each field in the model as follows:",
       {
         "font": "display font",
         "media": "array of media. appears to be unused",
         "name": "field name",
         "ord": "ordinal of the field - goes from 0 to num fields -1",
         "rtl": "boolean, right-to-left script",
         "size": "font size",
         "sticky": "sticky fields retain the value that was last added \
                    when adding new notes"
      }
    ],
    "id": "model ID, matches cards.mid",
    "latexPost": "String added to end of LaTeX expressions",
    "latexPre": "preamble for LaTeX expressions",
    "mod": "modification time in milliseconds",
    "name": "model name",
    "req": [
      "Array of arrays describing which fields are required \
       for each card to be generated",
      [
        "array index, 0, 1, ...",
        "? string, all",
        "another array",
        ["appears to be the array index again"]
      ]
    ],
    "sortf": "Integer specifying which field is used for sorting (browser)",
    "tags": "Anki saves the tags of the last added note to the current model",
    "tmpls": [
      "JSONArray containing object of CardTemplate for each card in model",
      {
        "afmt": "answer template string",
        "bafmt": "browser answer format: used for displaying answer in browser",
        "bqfmt": "browser question format: \
                  used for displaying question in browser",
        "did": "deck override (null by default)",
        "name": "template name",
        "ord": "template number, see flds",
        "qfmt": "question format string"
      }
    ],
    "type": "Integer specifying what type of model. 0 for standard, 1 for cloze",
    "usn": "Update sequence number: used in same way as other usn vales in db",
    "vers": "Legacy version number (unused)"
}-
Field
deckscontains the JSON representation of a DeckManager (anki/decks.py). One key-value for each deck present in this collection:
{
   "1": {
      "desc": "",
      "name": "Default",
      "extendRev": 50,
      "usn": 0,
      "collapsed": false,
      "browserCollapsed": true,
      "newToday": [598,0],
      "timeToday": [598,0],
      "dyn": 0,
      "extendNew": 10,
      "conf": 1,
      "revToday": [598,0],
      "lrnToday": [598,0],
      "id": 1,
      "mod": 1417423954
   }
}
Whose definition follows:
{
    "name": "name of deck",
    "extendRev": "extended review card limit (for custom study)",
    "collapsed": "true when deck is collapsed",
    "usn": "Update sequence number: used in same way as other usn vales in db",
    "browserCollapsed": "true when deck collapsed in browser",
    "newToday": "two number array used somehow for custom study",
    "timeToday": "two number array used somehow for custom study",
    "dyn": "1 if dynamic (AKA filtered) deck",
    "extendNew": "extended new card limit (for custom study)",
    "conf": "id of option group from dconf in `col` table",
    "revToday": "two number array used somehow for custom study",
    "lrnToday": "two number array used somehow for custom study",
    "id": "deck ID (automatically generated long)",
    "mod": "last modification time",
    "desc": "deck description"
}-
Field
dconfcontains the JSON representation of a Deck Configuration:
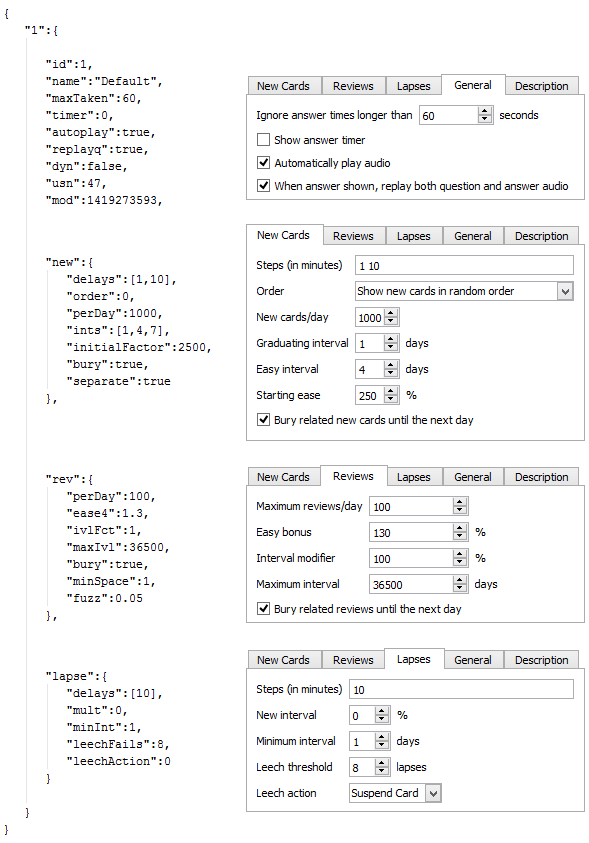
{
   "1": {
      "id": 1,
      "name": "Default",
      "maxTaken": 60,
      "timer": 0,
      "autoplay": true,
      "replayq": true,
      "dyn": false,
      "usn": 47,
      "mod": 1419273593,
      "new": {
         "delays": [1,10],
         "order": 0,
         "perDay": 1000,
         "ints": [1,4,7],
         "initialFactor": 2500,
         "bury": true,
         "separate": true
      },
      "rev": {
         "perDay": 100,
         "ease4": 1.3,
         "ivlFct": 1,
         "maxIvl": 36500,
         "bury": true,
         "minSpace": 1,
         "fuzz": 0.05
      },
      "lapse": {
         "delays": [10],
         "mult": 0,
         "minInt": 1,
         "leechFails": 8,
         "leechAction": 0
      }
   }
}-
Field
tagscontains the JSON representation of TagManager (anki/tags.py). Contains all tags in the collection with the usn number. (see above):
{
   "Web": 336,
   "Git": 336,
   "Java": 336,
   "vi": 336,
   "Hadoop": 336,
   "Productivity": 336,
   "Python": 336,
   "Refactoring": 336,
   "ElasticSearch": 336,
   "Bash": 336,
   "Training": 336,
   "Eclipse": 336,
   "Gradle": 336,
   "Craftsmanship": 336,
   "Patterns": 336,
   "Spring": 336,
   "Memory": 336,
   "Concurrency": 336,
   "Algorithms": 336,
}
-- Deletion log (content of the file deleted.txt in your Anki home directory)
-- Contains deleted cards, notes, and decks that need to be synced.
-- usn ,
-- oid is the original id.
-- type: 0 for a card, 1 for a note and 2 for a deck
CREATE TABLE graves (
usn integer not null,
-- should be set to -1
oid integer not null,
-- original id of the Card/Note/Deck
type integer not null
-- type: 0 for a card, 1 for a note and 2 for a deck
)-- Notes contain the raw information that is formatted into a number of cards
-- according to the models
CREATE TABLE notes (
id integer primary key,
-- The note id, epoch seconds of when the note was created
guid text not null,
-- A globally unique identifier (G8c7ZUgMvt) generated randomly,
-- almost certainly used for syncing
mid integer not null,
-- The model id
mod integer not null,
-- Modification timestamp, epoch seconds
usn integer not null,
-- update sequence number: for finding diffs when syncing with AnkiWeb.
-- See the description in the cards table for more info
tags text not null,
-- A space-separated list of tags
-- includes space at the beginning and end, for LIKE "% tag %" queries
flds text not null,
-- the values of the fields in this note. separated by 0x1f (31) character.
-- For example, contains: <question>\x1f<answer>.
sfld integer not null,
-- sort field: used for quick sorting and duplicate check
-- The value of the field having the index 'sortf' as defined by the model
csum integer not null,
-- Field checksum used for duplicate check.
-- 32 bits unsigned integer of the first 8 digits of sha1 hash
-- of the first field of the note
flags integer not null,
-- unused. Always 0
data text not null
-- unused. Always an empty string
)-- revlog is a review history; it has a row for every review you've ever done!
CREATE TABLE revlog (
id integer primary key,
-- Epoch-seconds timestamp of when you did the review.
-- Initialized to "int(time.time()*1000)"
cid integer not null,
-- cards.id
usn integer not null,
-- The update sequence number of the collection: for finding diffs
-- See the description in the cards table for more info
ease integer not null,
-- Which button you pushed to score your recall.
-- 1(wrong), 2(hard), 3(ok), 4(easy)
ivl integer not null,
-- Interval. Used by SRS algorithm
lastIvl integer not null,
-- Last Interval. Used by SRS algorithm
factor integer not null,
-- Factor. Used by SRS algorithm
time integer not null,
-- How many milliseconds your review took, up to 60000 (60s)
type integer not null
-- 0=lrn, 1=rev, 2=relrn, 3=cram
)Anki Media Database Schema
CREATE TABLE media (
    fname text not null primary key,
    -- The filename relative (no path, filename is always relative
    -- to media directory)

    csum text,
    -- SHA1 hash on the media file content (null indicates deleted file)

    mtime int not null,
    -- mtime of media file. Zero if deleted

    dirty int not null
    -- 0 if file up-to-date
)

-- Only one row present
CREATE TABLE meta (
    dirMod int,
    -- _mtime of the folder containing the media

    lastUsn int
    -- Last synch update timestamp concerning the media folder only
    -- (different from Cards USN)
)
Step by Step
In this part, we will create through the GUI a new deck and add a new card. We use a fresh anki installation.
|
How to inspect database changes when using Anki?
We could use the sqlite CLI to generate a dump before and after each operation executed through the Anki Desktop application.
$ sqlite3 collection.anki2
sqlite>.databases
seq name  file
--- ----- --------------------
0   main  C:\collection.anki2
sqlite>.once dump.sql
sqlite>.dump
By default, sqlite3 sends query results to standard output. So, we use the ".once" command to redirect query results to a file. (Use the ".output" option to redirect all commands and not just the next one). Check the official documentation for help about the CLI options: https://www.sqlite.org/cli.html Finally, we can use the generated dumps to compare the data and determine what was exactly updated by Anki. |
To force Anki to use a fresh installation, we will override the folder location to point to an empty directory (see https://ankisrs.net/docs/manual.html#startupopts for more information about the option -b).
On Windows, just click right on the icon and update the target field to add the option. Ex:
"C:\Program Files (x86)\Anki\anki.exe" -b "D:\AnkiTmp"
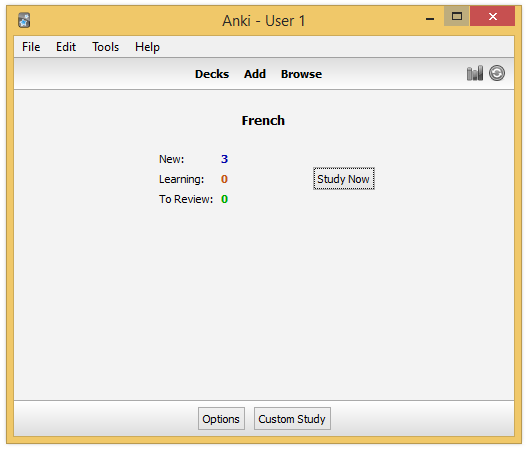
Relaunch Anki, select your language, and the home screen should appear, containing only the deck "Default":
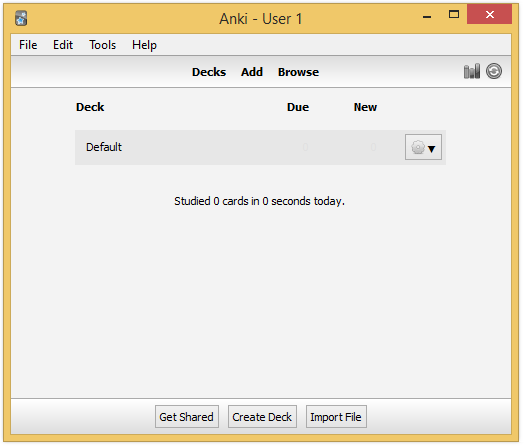
By default, Anki creates a default collection. This is the only row present in database at first:
INSERT INTO "col"
  (id, crt, mod, scm, ver, dty, usn, ls, conf, models, decks, dconf, tags)
  VALUES (
    1,
    1468375200,
    1468406322822,
    1468406322821,
    11,
    0,
    0,
    0,
    '{"id": 1, "mod": 0, "curDeck": 1, "dueCounts": true, ... }',
    '{}'
);
Let’s try to create a new deck.
Deck creation
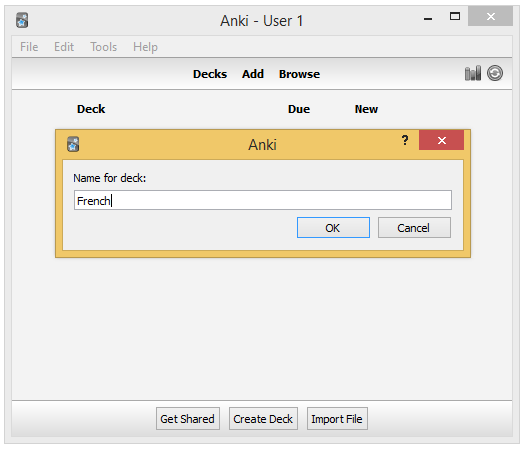
Internally Anki just update the default collection to add the new deck in the dconf field:
{
  "1":             { "name": "Default" ... }
  "1468406431488": {"name": "French",  ... }
}
The code: (aqt/deckbrowser.py#53)
deck = getOnlyText(_("Name for deck:"))
if deck:
    self.mw.col.decks.id(deck)
And in anki/decks.py#125:
def id(self, name, create=True, type=defaultDeck):
    "Add a deck with NAME. Reuse deck if already exists. Return id as int."
Card creation
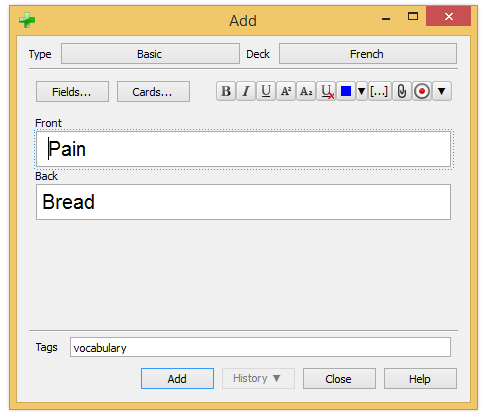
Anki updates the collection to add the new tag (field tags):
UPDATE col SET tags = '{"vocabulary": -1}' WHERE id = 1(-1 is used to tell Anki to synchronize this tag with the server on the next synchronization with AnkiWeb)
Anki inserts a new row in the table notes:
INSERT INTO "notes"
  VALUES(
    1468406595423,
    'c}s`dBG4e-',
    1468406557944,
    1468406609,
    -1,
    ' vocabulary ',
    'Pain Bread',
    'Pain',
    2687916407,
    0,
    ''
  );
And a new row in the table cards as it is a Basic card:
INSERT INTO "cards"
  VALUES(
    1468406609380,
    1468406595423,
    1468406570134,
    0,
    1468406609,
    -1,0,0,1,0,0,0,0,0,0,0,0,'');
The code: (aqt/addcards.py)
On dialog opening:
def __init__(self, mw):
    f = self.mw.col.newNote()
    self.editor.setNote(f, focus=True)

When clicking on the Add button:

def addCards(self):
    self.editor.saveTags()
    self.editor.saveAddModeVars()
    note = self.editor.note
    note = self.addNote(note)

def saveTags(self):
    self.note.tags = self.mw.col.tags.canonify(
        self.mw.col.tags.split(self.tags.text()))
    self.tags.setText(self.mw.col.tags.join(self.note.tags).strip())

def saveAddModeVars(self):
    # save tags to model
    m = self.note.model()
    m['tags'] = self.note.tags
    self.mw.col.models.save(m)

def addNote(self, note):
    note.model()['did'] = self.deckChooser.selectedId()
    cards = self.mw.col.addNote(note)
In anki/collection.py:
def addNote(self, note):
    "Add a note to the collection. Return number of new cards."
Let’s try a card of type "Reversed":

Adding a reversed card does not change anything in the UI code. The only difference is that the previous method addNode defined in collection.py will returned two cards instead of one in our first example. In database, two rows will be added in the table cards:
INSERT INTO "notes"
  VALUES(1468406642317,'OfSY=ipt]-',1468406557940,1468406643,
         -1,' vocabulary ','Car Voiture','Car',3158811612,0,'');
INSERT INTO "cards"
  VALUES(1468406643702,1468406642317,1468406570134,0,...);
INSERT INTO "cards"
  VALUES(1468406643703,1468406642317,1468406570134,1,...);
Studying
Studying is the act of reviewing our previously created card. After each review, the SRS algorithm runs to reschedule the card. The metadata required by the algorithm is updated to reflect the new due date.
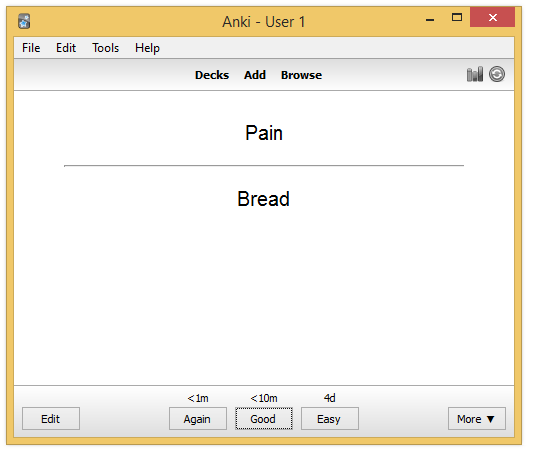
For this card, we choose the second button, to study again the card in 10 minutes from now.
UPDATE cards
SET type   = 1          -- new => learning
    queue  = 1          -- new queue => learning queue
    due    = 1468407304 -- now + 10 minutes
    ivl    = 0          -- 1 day
    reps   = 1          -- We just did the first review!
    lapses = 0          -- We don't have forgot the answer
    left   = 1001       -- 1001 repetitions left till graduation
WHERE id = 1468406609380
We register the review in the table revlog:
INSERT INTO "revlog" (id, cid, usn, ease, ivl, lastIvl, factor, time, type)
    VALUES(
        1468406665035,
        1468406609380, -- card id
        -1,            -- to send on next synchronization
        2,             --
        -600,          -- negative = second (10 minutes)
        -60,           -- last ivl was 1 minutes
        0,
        2016,          -- 2 seconds to answer
        0              -- learning
    );
In the code: (aqt/reviewer.py#259)
def _answerCard(self, ease):
    "Reschedule card and show next."
    self.mw.col.sched.answerCard(self.card, ease)
    self.mw.autosave()
    self.nextCard()
Where answerCard is defined in anki/sched.py#58:
def answerCard(self, card, ease):
    "Entry point to the SRS algorithm"
In anki/collection.py#136:
def autosave(self):
    "Save if 5 minutes has passed since last save."
    if time.time() - self._lastSave > 300:
        self.save()
This method autosave explain why Anki need to synchronize when we quit the application. Anki does not save systematically after each command but wait 5 minutes between two saves to minimize the interaction with the database.
This marks the end of the reverse engineering of Anki. We have seen how Anki works under the hood — when we add a new deck or a new card and what happens when we study. We understand the database schema and have a better comprehension of the internal API of Anki.
In the next part, we are going to use this knowledge to create programmatically flashcards in record time, without interacting with the Anki application!
Anki Scripting Background
Creating a flashcard is the first step to learn something new. To make it more memorable, you could customize the content of your flashcard: add a sound with the pronunciation of a new word, add a funny picture, and so one. Therefore, creating flashcards manually is important. But creating flashcards through the UI is also time-consuming in some cases. What if we need to create thousands of flashcards to learn the 5000 most common words in a new language?
Introduction
Anki is an open-source solution, published on GitHub. The code source is accessible to anyone going on the repository. With minimal programming skills, it is easy to script Anki to add new flashcards. Several options are possible:
-
Insert data directly in the SQLite database used by Anki
-
Write a Python program using the internal API of Anki
This post will concentrate on the second option. The first option could be implemented based on the information published in the first part but is not the optimal solution (high coupling, necessity to specify all fields when most of them are irrelevant). This solution was already partially documented online. The Python solution is more powerful. You could use a Python module to read a PDF or an Epub and generate the associated flashcards. You could use the Google Images API to retrieve funny pictures to integrate in our flashcards. The only limit is our imagination.
Python Scripting
The Anki source is not intended to be reused in other program so the code is not packaged as a Python module we could install as easily as:
$ pip install anki
# Doesn't work
One solution is to clone the official repository and put our code along the Anki code source but this solution is not optimal. To decouple our code from the Anki Source, a better strategy is to use a Git submodule.
First, create new project:
$ git init anki-scripting
$ cd anki-scripting/
Clone Anki using the following command:
$ git submodule add https://github.com/dae/anki.git
Cloning into 'anki'...
remote: Counting objects: 4890, done.
remote: Total 4890 (delta 0), reused 0 (delta 0), pack-reused 4890
Receiving objects: 100% (4890/4890), 2.09 MiB | 1.41 MiB/s, done.
Resolving deltas: 100% (3374/3374), done.
Checking connectivity... done.
$ ls
anki
Then, we need to download Anki dependencies. In this post, we will use Pip, the classic tool for installing Python packages. To avoid polluting existing Python projects you could have in local, we will use virtualenv. The recommended way to do that in Python is to use virtualenv to isolate our project from other projects, so two projects could depend on conflicting versions of the same dependency. To install virtualenv globally, run the following command:
$ sudo pip install virtualenv
| virtualenv is probably the only dependency you need to install globally when doing Python. Once installed, add a new virtual environment to each Python project, so their dependencies get installed under their directory. |
At the root of the repository, execute the following command to create a new virtual environment:
$ virtualenv venv
$ source venv/bin/activate
When you need to switch to another project, just run the commands:
$ deactivate  # added by the activate script
$ source <myotherproject>/venv/bin/activate
So, to install Anki dependencies, everything we need to do is run the Pip installer, passing the requirements.txt file present at the root of the Anki repository. This file contains the list of Python modules required by Anki.
$ pip install -r anki/requirements.txt
We could now create our first script. Add a new file at the root of the project:
import sys, os

# Load Anki library
sys.path.append("anki") (1)
from anki.storage import Collection

# Define the path to the Anki SQLite collection
PROFILE_HOME = os.path.expanduser("~/Documents/Anki/User 1") (2)
cpath = os.path.join(PROFILE_HOME, "collection.anki2")

# Load the Collection
col = Collection(cpath, log=True) # Entry point to the API

# Use the available methods to list the notes
for cid in col.findNotes("tag:English"): (3)
    note = col.getNote(cid)
    front =  note.fields[0] # "Front" is the first field of these cards
print(front)| 1 | We need to add the Anki project in our path |
| 2 | We use the default installation folder of Anki on Linux. Please update the variable PROFILE_HOME to match your configuration. |
| 3 | We filter the cards to only keep the card concerning the English language. Use tag:* to select all of your cards. |
When running the script, you will see the "Front" field of each card displayed to the console:
Car
Dog
House
Train
Computer
Congratulations! You just have created your first Python script using the Anki API.
As time passes, Anki source will be updated. To update our submodule, just move to the submodule directory and update the HEAD reference like any other repository. Do not forget to commit in order to update the reference maintained by the parent repository:
$ cd anki
$ git pull
$ cd ..
$ git commit -am "Update Anki source"
This ends our introduction of the Anki API. We covered enough information to get started but before tackling the problem of bulk loading, let’s begin with a simple use case: export all our flashcards to HTML, probably the most universal format today. If one day, we choose an alternative solution to Anki, it would be easy to import-export our cards to this other tool (most modern tool like Evernote, Google Keep, and many others offers a REST API for this purpose).
Case Study: Exporting flashcards in HTML
Let’s begin with a basic version to dump each card answer in its own HTML file.
First, we create a new file generate_site.py inside a new folder userscripts at the root of the project. The folder hierarchy should be:
anki/ <-- submodule
  anki/
  aqt/
  ...
userscripts/ <-- custom code
  generate_site.py
As for the previous example, we need to include the anki source in our path to be able to exploit the Anki API:
sys.path.append("../anki")
from anki.storage import Collection # OK
We define constants to configure our environment:
PROFILE_HOME = "~/Documents/Anki/User 1"
OUTPUT_DIRECTORY = "/tmp/out"
We start by loading the existing anki collection:
cpath = os.path.join(PROFILE_HOME, "collection.anki2")
col = Collection(cpath, log=True) # Entry point to the API
The class Collection contains a long list of methods and attributes to access the notes, the cards, and the models.
We use the method findCards to restrict the cards to export:
for cid in col.findCards("tag:Git"):

    card = col.getCard(cid)

    # Retrieve the node to determine the card type model
    note = col.getNote(card.nid)
    model = col.models.get(note.mid)

    # Card contains the index of the template to use
    template = model['tmpls'][card.ord]

    # We use a convenient method to evaluate the templates (question/answer)
    rendering = col.renderQA([cid], "card")[0]
    # Only one element when coming from a given card (cid)
    # Could be more when passing a note of type "Basic (with reversed card)"

    question = rendering['q']
    answer = rendering['a']

    css = model['css']

    html = """<!doctype html>
<html lang="fr">
<head>
  <meta charset="utf-8">
  <title>Card</title>
  <style>
  %s
  </style>
</head>
<body>
  <div class="card">
  %s
  </div>
</body>
</html>""" % (css, answer)

    card_filename = "card-%s.html" % cid
    card_file = codecs.open(
        os.path.join(OUTPUT_DIRECTORY, card_filename), "w", "utf-8")
    card_file.write(html)
    card_file.close()
The code iterate over the card identifiers and begin by collecting required information about the card (template, css, …). Once this is done, we create the HTML content by injecting the model CSS and the rendered card content (fields are replaced by values with the method renderQA).
When running, the program generate a list of files inside the folder defined by the constant OUTPUT_DIRECTORY. Here is the content of the file card-1429876617511.html:
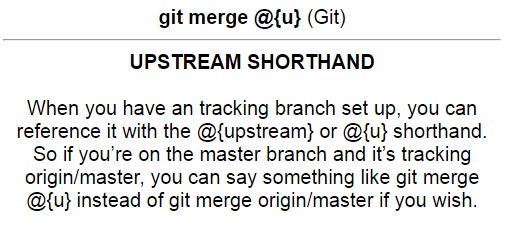
To generate an index page listing all the exported cards, we need to update the previous code to store the list of processed card:
cards = {} # Keep a log of processed cards
for cid in col.findCards("tag:Git"):
    # ...
    cards[cid] = {
        'file': card_filename,
        'question': question
    }
Next, we iterate over this list to generate an HTML list before injecting it in an HTML document:
card_list = ''
for cid, props in cards.iteritems():
    card_list += "<li><a href=\"%s\">%s</a></li>" %
                     (props['file'], props['question'])

html = """<!doctype html>
<html lang="fr">
<head>
  <meta charset="utf-8">
  <title>Anki Export</title>
</head>
<body>
  <ul>
  %s
  </ul>
</body>
</html>""" % (card_list)

index_filename = "index.html"
index_file = codecs.open(os.path.join(OUTPUT_DIRECTORY, index_filename), \
                         "w", "utf-8")
index_file.write(html)
index_file.close()
When running the program, a new file index.html is generated in the target directory:

The code works but there remains a concern to address: the medias. Indeed, cards could reference external resources like images or sounds, which are all stored in a single folder collection.media under your profile directory. So, we need to extract there resources too and update the links inside the card text to reflect the new location.
A basic strategy could be to duplicate the whole folder. To avoid copying resources from cards that we don’t want to export, we will instead copy each file independently while processing the card. So, we need to update again the card processing code again:
for cid in col.findCards("tag:Git"):
    # ...
    rendering = col.renderQA([cid], "card")[0]
    question = extractMedia(rendering['q'])
    answer = extractMedia(rendering['a'])


def extractMedia(text):
    regex = r'<img src="(.*?)"\s?/?>'
    pattern = re.compile(regex)

    src_media_folder = os.path.join(PROFILE_HOME, "collection.media/")
    dest_media_folder = os.path.join(OUTPUT_DIRECTORY, "medias")

    # Create target directory if not exists
    if not os.path.exists(dest_media_folder):
        os.makedirs(dest_media_folder)

    # Copy each images referenced by this card
    for (media) in re.findall(pattern, text):
        src = os.path.join(src_media_folder, media)
        dest = os.path.join(dest_media_folder, media)
        shutil.copyfile(src, dest)

    # And don't forget to change the href attribute to reflect the new location
    text_with_prefix_folder = re.sub(regex, r'<img src="medias/\1" />', text)

    return text_with_prefix_folder
When running the program again, a new folder medias will be created inside the target directory:
out/
  medias/
    paste-2911987826689.jpg
If we open the associated card in our browser, we should see this picture displayed correctly:
Great! We have successfully exported our Anki collection into a standard format but the result does not look good. Let’s add a little bit of JavaScript and CSS to make the application looks better.
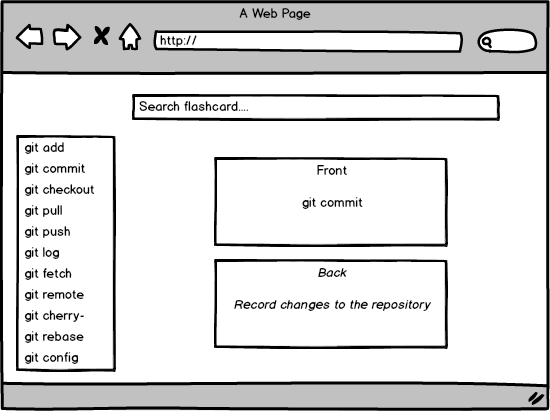
What we want is a basic single-page application (SPA) that displays our flashcards. A search field will be available at the top of the page to help us filter the cards. Flashcard content will only be displayed when selecting the flashcard title in the list. The following is a draft of this application demo:
To add dynamic behavior to our SPA, we will use AngularJS. AngularJS keep our code clean by separating our model from the view and controller (Pattern MVC). To do that, we are going to convert the static HTML list of cards to JSON format:
card_list = '['
for cid, props in cards.iteritems():
    card_list += "{ 'name': \"%s\", 'file': '%s', 'tags': [ %s ] },\n" % (
        props['name'],
        props['question_file'],
        props['answer_file'],
        "\"" + "\",\"".join(props['tags']) + "\"")
card_list += ']'
We also exploit the card’s tags, easily retrieved from the note object:
cards[cid] = {
    'name': rawText(question), # rawText remove HTML tags from card content
    'file': card_filename,
    'tags': note.tags
}
We could now redesign our HTML template to integrate the new layout:
html = """<!doctype html>
<html lang="fr" ng-app="ankiApp">
<head>
  <meta charset="utf-8">
  <title>Anki Export</title>
  <script src="//ajax.googleapis.com/ajax/libs/angularjs/1.5.7/angular.min.js">
  </script>
  <script>
angular.module('ankiApp', [])
  .controller('AnkiController', function() {
    var anki = this;
    anki.cardList = %s;
    anki.selectedCard = anki.cardList[0];

    anki.select = function(card) {
      anki.selectedCard = card;
    }
  });
  </script>
</head>
<body>
  <div ng-controller="AnkiController as anki">
      <div id="search">
        <input type="text" ng-model="anki.search" placeholder="Search...">
      </div>
      <nav id="list">
        <ul>
          <li ng-repeat="card in anki.cardList | filter:anki.search \
                       | orderBy:'name'"" ng-click="anki.select(card)">
            {{card.name}}
            <span class="tag" ng-repeat="tag in card.tags">{{tag}}</span>
          </li>
        </ul>
      </nav>
      <div id="card">
        <iframe ng-src="{{anki.selectedCard.file}}" width="80%%">
        </iframe>
      </div>
  </div>
</body>
</html>""" % (card_list)
We iterate over the JSON array containing the cards we just created. When the user clicks on a card title, the method select defined in the controller is called. This method stores the selected card in the model. AngularJS refreshes our page and the iframe is updated with the content of the selected flashcard. Last thing to notice, we only display the flashcards matching the query entered by the user in the search field.
Let’s add the "final touch", the CSS:
<style>
body {
background-color: #0079bf;
}
#search {
position: fixed;
height: 70px;
width: 100%;
padding-top: 20px;
text-align: center;
}
#search input {
width: 80%;
height: 30px;
border-radius: 15px;
text-align: center;
border: none;
box-shadow: 2px 2px #222;
}
#list {
position: fixed;
width: 50%;
top: 70px;
bottom: 0;
left: 0;
}
#list ul {
list-style-type: none;
}
#list li {
background-color: white;
border: 1px solid silver;
border-radius: 2px;
font-family: 'Handlee', cursive;
width: 90%;
padding: 5px 10px;
margin-top: 10px;
margin-bottom: 10px;
cursor: pointer;
}
#card {
position: fixed;
width: 50%;
right: 0;
top: 270px;
bottom: 0;
}
iframe {
background-color: white;
border: none;
box-shadow: 5px 5px 3px #333;
}
.tag {
float: right;
margin-right: 10px;
padding: 2px 5px;
background-color: orangered;
color: white;
font-size: 12px;
font-family: Arial;
}
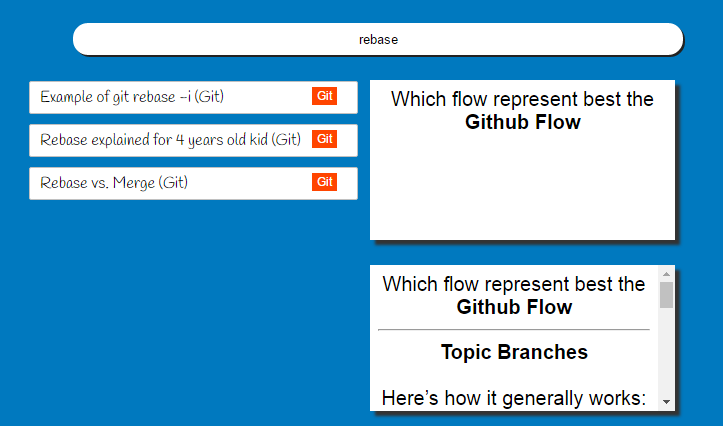
</style>The layout is divided in three section: the search bar at the top, the list of flashcards on the left and the currently selected flashcard on the right. We use fixed positioning to keep all sections always present on the screen. The results now looks like:
This ends our first case study. We have seen how to exploit the Anki API to retrieve our data and export them to another format. In the next case study, we are going to use the Anki API to load a batch of cards, created from a book.
Here is the full listing of the code:
import sys, os, codecs, re, shutil
sys.path.append("..")
from anki.storage import Collection

# Constants
PROFILE_HOME = "C:/Users/Julien/Anki/User 1"
OUTPUT_DIRECTORY = "C:/out"

# Utility methods

def rawText(text):
    """ Clean question text to display a list of all questions. """
    raw_text = re.sub('<[^<]+?>', '', text)
    raw_text = re.sub('"', "'", raw_text)
    raw_text = raw_text.strip()
    if raw_text:
        return raw_text
    else:
        return "Untitled"

def extractMedia(text):
    regex = r'<img src="(.*?)"\s?/?>'
    pattern = re.compile(regex)

    src_media_folder = os.path.join(PROFILE_HOME, "collection.media/")
    dest_media_folder = os.path.join(OUTPUT_DIRECTORY, "medias")

    # Create target directory if not exists
    if not os.path.exists(dest_media_folder):
        os.makedirs(dest_media_folder)

    for (media) in re.findall(pattern, text):
        src = os.path.join(src_media_folder, media)
        dest = os.path.join(dest_media_folder, media)
        shutil.copyfile(src, dest)

    text_with_prefix_folder = re.sub(regex, r'<img src="medias/\1" />', text)

    return text_with_prefix_folder


# Load the anki collection
cpath = os.path.join(PROFILE_HOME, "collection.anki2")
col = Collection(cpath, log=True)

# Iterate over all cards
cards = {}
for cid in col.findCards("tag:Git"):

    card = col.getCard(cid)

    # Retrieve the node to determine the card type model
    note = col.getNote(card.nid)
    model = col.models.get(note.mid)
    tags = note.tags

    # Card contains the index of the template to use
    template = model['tmpls'][card.ord]

    # We retrieve the question and answer templates
    question_template = template['qfmt']
    answer_template = template['afmt']

    # We could use a convenient method exposed by Anki to evaluate the template
    rendering = col.renderQA([cid], "card")[0]
    # Only one element when coming from a given card
    # Could be more when passing a note of type "Basic (with reversed card)"

    question = rendering['q']
    answer = rendering['a']

    question = extractMedia(question)
    answer = extractMedia(answer)

    css = model['css']

    html = """<!doctype html>
<html lang="fr">
<head>
  <meta charset="utf-8">
  <title>Card Answer</title>
  <style>
  %s
  </style>
</head>
<body>
  <div class="card">
  %s
  </div>
</body>
</html>""" % (css, answer)

    card_filename = "card-%s.html" % cid
    card_file = codecs.open(os.path.join(OUTPUT_DIRECTORY, card_filename), \
                            "w", "utf-8")
    card_file.write(html)
    card_file.close()

    cards[cid] = {
        'name': rawText(question),
        'file': card_filename,
        'tags': tags
    }


# Generate a list of all cards
card_list = '['
for cid, props in cards.iteritems():
    card_list += "{ 'name': \"%s\", 'file': '%s', 'tags': [ %s ] },\n" % (
        props['name'],
        props['file'],
        "\"" + "\",\"".join(props['tags']) + "\"")
card_list += ']'

html = """<!doctype html>
<html lang="fr" ng-app="ankiApp">
<head>
  <meta charset="utf-8">
  <title>Anki Export</title>
  <script src="//ajax.googleapis.com/ajax/libs/angularjs/1.5.7/angular.min.js">
  </script>
  <style>
body {
    background-color: #0079bf;
}
#search {
    position: fixed;
    height: 70px;
    width: 100%%;
    padding-top: 20px;
    text-align: center;
}
#search input {
    width: 80%%;
    height: 30px;
    border-radius: 15px;
    text-align: center;
    border: none;
    box-shadow: 2px 2px #222;
}
#list {
    position: fixed;
    width: 50%%;
    top: 70px;
    bottom: 0;
    left: 0;
}
#list ul {
    list-style-type: none;
}
#list li {
    background-color: white;
    border: 1px solid silver;
    border-radius: 2px;
    width: 90%%;
    padding: 5px 10px;
    margin-top: 10px;
    margin-bottom: 10px;
    cursor: pointer;
}
#card {
    position: fixed;
    width: 50%%;
    right: 0;
    top: 85px;
    bottom: 0;
}
iframe {
    background-color: white;
    border: none;
    box-shadow: 5px 5px 3px #333;
}
.tag {
    float: right;
    margin-right: 10px;
    padding: 2px 5px;
    background-color: orangered;
    color: white;
    font-size: 12px;
    font-family: Arial;
}
  </style>
  <script>
angular.module('ankiApp', [])
  .controller('AnkiController', function() {
    var anki = this;
    anki.cardList = %s;
    anki.selectedCard = anki.cardList[0];

    anki.select = function(card) {
      anki.selectedCard = card;
    }
  });
  </script>
</head>
<body>
  <div ng-controller="AnkiController as anki">
      <div id="search">
        <input type="text" ng-model="anki.search" placeholder="Search...">
      </div>
      <nav id="list">
        <ul>
          <li ng-repeat="card in anki.cardList | filter:anki.search \
                                               | orderBy:'name'""
              ng-click="anki.select(card)">
            {{card.name}}
            <span class="tag" ng-repeat="tag in card.tags">{{tag}}</span>
          </li>
        </ul>
      </nav>
      <div id="card">
        <iframe ng-src="{{anki.selectedCard.file}}" width="80%%">
        </iframe>
      </div>
  </div>
</body>
</html>""" % (card_list)


index_filename = "index.html"
index_file = codecs.open(os.path.join(OUTPUT_DIRECTORY, index_filename), \
                         "w", "utf-8")
index_file.write(html)
index_file.close()
Case Study: Convert an EPUB to Flashcards
Let’s me present you the context. We just bought a new book to learn the common English expressions. This book contains around 4000 expressions. If we consider it takes two minutes to create a flashcard, more than 100 hours will be required to overcome this daunting task. So, what can we do? One solution is to script the creation of the flashcards and this is exactly what we are going to do here.
This post will be divided in two sections. In the first part of this post, we are going to create a small program to read an Epub file in Python. In the second part, we will extend this program to insert the content directly into our Anki collection.
|
But does it not preferable to manually create the flashcards in order to retain more?
Of course! Creating manually a flashcard is always better than automating its creation. When you enter the words on the keyboard, or when you search on Google Images a memorable picture, you create connections inside your memory and this considerably help you to start fixing this new information. The manual creation is perfectly fine when learning your first words in a new language because it is easy to find a great picture or a personal story about it. Here, we are interested in common idioms, phrases that often does not mean what common sense would say. Relevant memorable pictures are difficult to find, so creating the flashcards manually does not help that much to fix the information in your brain. It is better to spend the 100 or more hours on studying the flashcards than on creating them. |
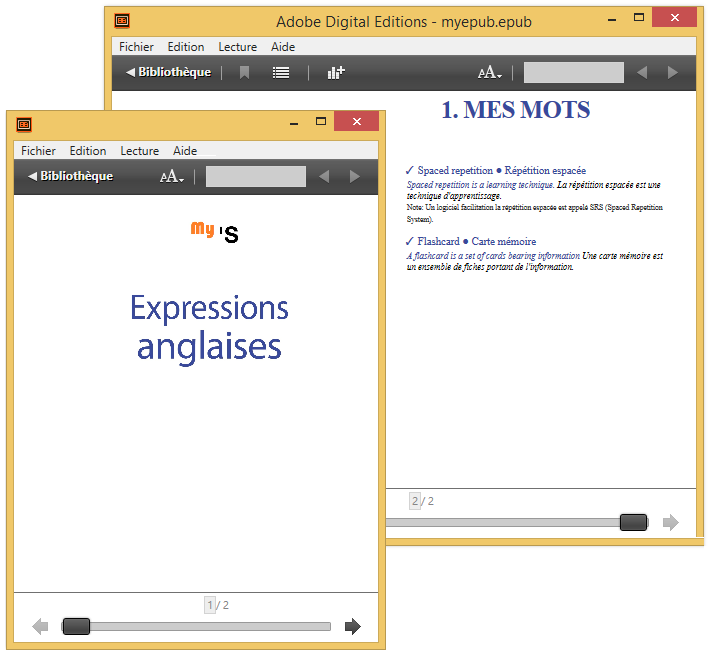
Part I: Reading the Ebook (ePub)
The book is available in ePub format. The term is short for electronic publication. EPUB 3 is currently the most portable ebook format (Amazon has its own proprietary format for its Kindle but every other software readers such as Kobo or Bookeen supports this format).
For our task, we only need to know that an ePub is just a ZIP archive containing a website written in HTML5, including HTML files, images, CSS stylesheets, and other assets like video.
The ebook is subject to a copyright, so to avoid any violation, I rewrite a short version by customizing the text. This demonstration ebook is available in the repository associated to this post. To inspect its content, just unzip the archive:
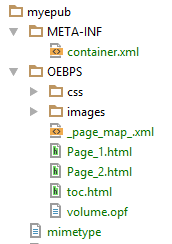
The first file in the archive must be the mimetype file. It must be uncompressed so that non-ZIP utilities can read the mimetype. The mimetype file must be an ASCII file that contains the string application/epub+zip.
There must be a META-INF directory containing container.xml. This file points to the file defining the contents of the book:
<?xml version="1.0"?>
<container version="1.0"
           xmlns="urn:oasis:names:tc:opendocument:xmlns:container">
<rootfiles>
  <rootfile full-path="OEBPS/volume.opf"
            media-type="application/oebps-package+xml" />
</rootfiles>
</container>
Apart from mimetype and META-INF/container.xml, the other files (HTML, CSS and images files) are traditionally put in a directory named OEBPS. This directory contains the volume.opf file referenced in the previous file. Here is an example of this file:
<?xml version="1.0" encoding="UTF-8" standalone="no"?>
<package xmlns="http://www.idpf.org/2007/opf"
         prefix="cc: http://creativecommons.org/ns"
         version="3.0">
  <metadata xmlns:dc="http://purl.org/dc/elements/1.1/"
            xmlns:opf="http://www.idpf.org/2007/opf">
    <dc:title>Julien's Mes Expressions anglaises</dc:title>
    <dc:language>fr</dc:language>
    <meta content="cover" name="cover"/>
    <meta property="rendition:layout">pre-paginated</meta>
    <meta property="rendition:orientation">auto</meta>
    <meta property="rendition:spread">landscape</meta>
  </metadata>
  <manifest>
    <item href="images/cover.jpg" id="cover" media-type="image/jpeg"
          properties="cover-image"/>
    <item href="images/Page_1.jpg" id="jpg296" media-type="image/jpeg"/>
    <item href="Page_1.html" id="Page_1" media-type="application/xhtml+xml"/>
    <item href="Page_2.html" id="Page_2" media-type="application/xhtml+xml"/>
    <item href="toc.html" id="toc" media-type="application/xhtml+xml"
          properties="nav"/>
    <item href="css/ENE.css" id="css288" media-type="text/css"/>
    <item href="_page_map_.xml" id="_page_map_"
          media-type="application/oebps-page-map+xml"/>
  </manifest>
  <spine page-map="_page_map_">
    <itemref idref="Page_1" linear="yes" properties="page-spread-right"/>
    <itemref idref="Page_2" linear="yes" properties="page-spread-right"/>
  <spine>
</package>
In the manifest section, we can see all web resources included in this epub. This are these files that interested us, in particular the HTML files. If you open the book with an ebook reader (your device or an application like Calibre), you could see the book content:
If you want to know more about the epub format, O’Reilly published whole books on the subject.
Let’s see how the HTML looks like. The Page_1.html page contains only a picture with the cover of the book. We could ignore it. The next page Page_2.html is an example of page we need to parse to extract the English expressions. Here is an extract of this file:
<?xml version="1.0" encoding="UTF-8" standalone="no"?>
<html xmlns="http://www.w3.org/1999/xhtml">
<head>
<meta charset="utf-8"/>
<meta content="width=1277,height=2048" name="viewport"/>
<title>Page 2</title>
<link href="css/ENE.css" rel="stylesheet" type="text/css"/>
</head>
<body id="Mes-Expressions" lang="fr-FR"
      style="width: 1277px; height: 2048px;" xml:lang="fr-FR">
<article id="Layout"
         style="-webkit-transform-origin: 0% 0%; \
                -webkit-transform: scale(4.05545); \
                transform-origin: 0% 0%; \
                transform: scale(4.05545);">
<div class="Bloc-de-texte-standard" id="_idContainer009">
  <div style="width: 5046px; height: 8589px; position: absolute; \
              top: 6.11px; left: 0px; -webkit-transform-origin: 0% 0%; \
              -webkit-transform: scale(0.05); transform-origin: 0% 0%; \
              transform: scale(0.05);">

    <p class="_1_Chapter-Heading_Toc_1 ParaOverride-1"
       lang="en-GB" xml:lang="en-GB">
      <span class="CharOverride-2"
            style="position: absolute; top: 0px; \
                   left: 793.7px; letter-spacing: -18px;">
        1. Mes mots
      </span>
    </p>

    <p class="_1_IDIOM ParaOverride-1"
      style="position: absolute; top: 1250.55px; \
             left: 170.08px; letter-spacing: -1px;">
      <span class="Examples1 CharOverride-4">
        Spaced repetition ● Répétition espacée
      </span>
    </p>
    <p class="_2_EXEMPLE-IDIOM ParaOverride-1"
       style="position: absolute; top: 1546.89px; \
              left: 170.08px; letter-spacing: -3px;">
      <span class="EXEMPLE-IDIO CharOverride-5">
        Spaced repetition is a learning technique.
      </span>
      <span class="TRADUCTION-EXEMPLE-IDIOM CharOverride-7">
        La répétition espacée est une technique d'apprentissage.
      </span>
    </p>
    <p class="WARNING ParaOverride-1"
       style="position: absolute; top: 1950.29px; \
              left: 170.08px; letter-spacing: -1px;">
      <span class="CharOverride-10">
        Note: Un logiciel facilitation la répétition espacée
        est appelé SRS (Spaced Repetition System).
      </span>
    </p>
  </div>
</div>
</body>
</html>
If we simplify the HTML definition, we get something like this:
.Bloc-de-texte-standard#_idContainer* --> New page containing expressions
  .*Chapter-Heading_Toc* ---------------> New category found

  ._1_IDIOM ----------------------------> New idiom found
  .EXEMPLE-IDIO ------------------------> An example of the idiom examples
  .WARNING -----------------------------> A warning to complement the idiom

(Where * matches one or many characters)
We now have all the necessary information to begin our program. As usual, we will write our program in Python, the same language used by Anki.
First, we need to open each HTML page and check if this page contains idioms or not:
import codecs

for i in range(2, 3): # Only page 2 exists in our demo ebook...

    # Read the page content
    f = codecs.open("myepub/OEBPS/Page_%s.html" % i, "r", "utf-8")
    page_html = f.read()
    f.close()

    # Parse the HTML
    soup = BeautifulSoup(page_html, 'html.parser')

    # Search the page content
    for bloc in soup.find_all('div', { 'class': 'Bloc-de-texte-standard'}):

        # Only page with id beginning by _idContainer contains idioms
        if bloc.get('id') and bloc.get('id').startswith('_idContainer'):
            process_block(soup, bloc)
Then, for each block of idioms, the function process_block is called. This method takes two parameters:
- the BeautifulSoup HTML parser,
- the working HTML element
As some idioms cross two pages, we need to keep the chapter number (idioms are grouped by general subjects), the category (each subject is divided into many related categories) and the current idiom to complete it when we will parsed the next page. To do so, we will use global variables (not good OO-design but an adequate choice for such a simple program). The code consists of a loop to iterate over paragraphs and uses CSS classes to determine the type of each paragraph (idiom, example or warning). Here is the code:
def process_block(soup, bloc_element):
    global chapter
    global category
    global idiom

    for p in bloc_element.find_all('p'):

        classes = p.get('class')

        found = False
        for classe in classes:
            if u'Chapter-Heading_Toc' in classe \
            or u'chaper-headibg-2-chiffres' in classe:
                found = True
                category = p.get_text()
                index = category.index('. ')
                if index:
                    chapter = category[:index]
                    category = category[index+2:]
                print "Beginning category %s" % category

        if found:
            continue

        if u'_1_IDIOM' in classes: # New idiom
            idiom = Idiom(chapter, category)
            idioms.append(idiom)
            text = p.get_text()

            if '●' in text:
                index = text.index('●')
                idiom.set_en(text[:index])
                idiom.set_fr(text[index+1:])
            else:
                idiom.set_en(p.get_text())
        elif u'_2_EXEMPLE-IDIOM' in classes: # Example for previous idiom
            text = p.get_text()
            if '. ' in text:
                index = text.index('. ')
                idiom.add_example({
                  'en': text[:index + 1], 'fr': text[index +2:] })
            elif '? ' in text:
                index = text.index('? ')
                idiom.add_example({
                  'en': text[:index + 1], 'fr': text[index +2:] })
            elif '! ' in text:
                index = text.index('! ')
                idiom.add_example({
                  'en': text[:index + 1], 'fr': text[index +2:] })
            elif '.”' in text:
                index = text.index('.”')
                idiom.add_example({
                  'en': text[:index + 2], 'fr': text[index +2:] })
            else:
                print "[ERROR] Unable to find translation in example '%s'" \
                      % text
        elif u'WARNING' in classes: # WARNING
            idiom.add_warning(p.get_text())
        else:
            print "[ERROR] Unknown class %s" % (classes)
To avoid being polluted with all the span tag present in the source (the original epub contains a lot more span!), we use the method get_text() of the Soup parser to only extract the raw text. If the paragraph is an idiom, we know the english and french translations are separated by the special character ●. If the paragraph is an example, we search for a phrase separator (dot, question mark, exclamation point, etc). If the paragraph is a warning, we just have the keep the whole text.
For each idiom, we create a new object of type Idiom to group all the information about a given idiom. The collection of idioms is defined globally and will be reused in the second section of this blog post. Here is the definition of the class Idiom:
class Idiom:

    def __init__(self, chapter, category):
        self.category = category
        self.chapter = chapter
        self.en = ''
        self.fr = ''
        self.examples = []
        self.warnings = []

    def set_category(self, category):
        self.category = category

    def set_en(self, expression):
        self.en = expression

    def set_fr(self, expression):
        self.fr = expression

    def add_example(self, example):
        self.examples.append(example)

    def add_warning(self, text):
        self.warnings.append(text)

# List of all idioms
idioms = []
This ends the first section of this post. We have extracted all the relevant text from the ebook. The next big task is to load all of these idioms directly inside Anki.
Part II: Bulk loading the flashcards
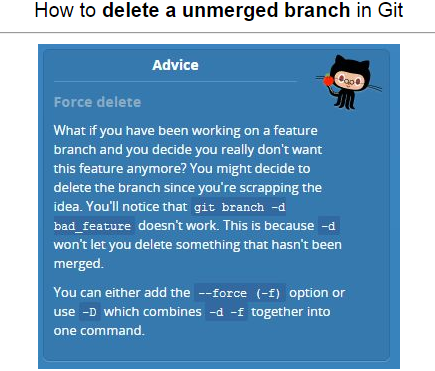
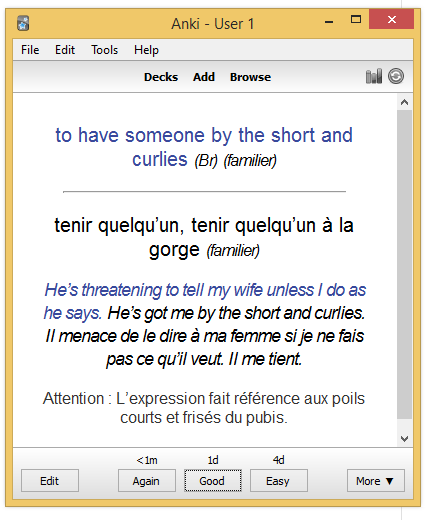
Before importing a flashcard, we need to design the card template. By default, Anki includes only simple card types: Basic, Basic (with reversed card). These card types have only two fields: the front text, and the back text. We need something more evolved to be able to includes examples and/or note information. We want our cards to look like the following picture:
We have two solutions: either we create the card type manually using the Anki API directly in Python, or create the card type through the GUI to benefit the direct feedback when defining the CSS declarations. We will choose the second solution but implementing the first one is relatively easy using code similar to the code we already wrote.
So, run the Anki program, and go to "Tools > Manage Note Types…", click on "Add", and choose "Clone: Basic (with reversed card)" as the model to clone. Name our note type Idiom.
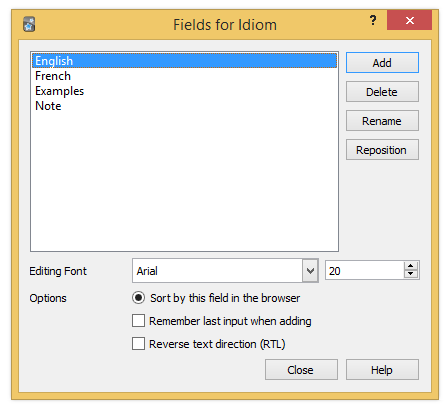
Return to the "Manage Note Types" screen and click on "Fields…". Remove the Front and Back fields and add four new fields like this:
Close the dialog and click on "Cards…". Again, we need the update the content to match the following screenshot:
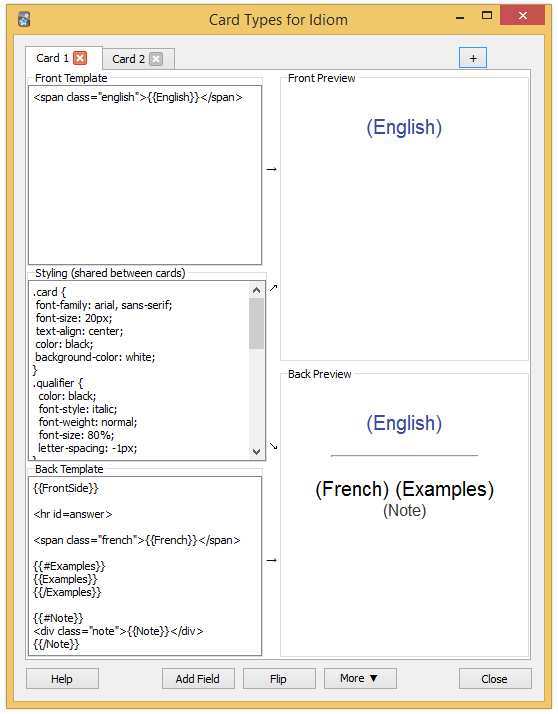
Here is the full CSS code:
.card {
 font-family: arial, sans-serif;
 font-size: 20px;
 text-align: center;
 color: black;
 background-color: white;
}

.qualifier {
  color: black;
  font-style: italic;
  font-weight: normal;
  font-size: 80%;
  letter-spacing: -1px;
}

.idiom .english {
  font-weight: bold;
  font-size: 110%;
}

.example {
  font-size: 18px;
  font-style: italic;
  letter-spacing: -1px;
  line-height: 130%;
}

.english {
  color: #39499b
}
.french {
  color: black;
}

.note {
  color: #333;
  font-size: 16px;
}
The back card is very similar. You only need to invert the French and English fields as shown in the following screenshot:

Then, close Anki to force it to write the changes to disk. Let’s go back to our program to add a new line at the end of the source code:
bulk_loading_anki(idioms)The function bulk_loading_anki iterate over the idioms, and create a new note for each of them. Before that, we need to retrieve our new note type Idiom to define it as the default (like we do when we use Anki through the UI). We also need to retrieve the deck in which to create the notes (English in our example but any deck would works too). Here is the code:
def bulk_loading_anki(idioms):

    # Load the anki collection
    cpath = os.path.join(PROFILE_HOME, "collection.anki2") (1)
    col = Collection(cpath, log=True) (2)

    # Set the model
    modelBasic = col.models.byName('Idiom')
    col.decks.current()['mid'] = modelBasic['id']

    # Get the deck
    deck = col.decks.byName("English")

    # Iterate over idioms
    for idiom in idioms:

        # Instantiate the new note
        note = col.newNote()
        note.model()['did'] = deck['id']

        # Set the content
        english_field = highlight_qualifier(idiom.en)
        french_field = highlight_qualifier(idiom.fr)
        examples_field = "" # fill below
        note_field =  "" # fill below

        if not idiom.en:
            # Should not happen
            continue
        if not idiom.fr and idiom.examples:
            # Sometimes, there is not translation in french,
            # we used the first example phrase instead
            english_field = idiom.examples[0]['en']
            french_field = idiom.examples[0]['fr']
        if "(familier)" in idiom.en:
            french_field += " " + highlight_qualifier('(familier)')

        for example in idiom.examples:
            examples_field += '<p class="example">' +
               '<span class="english">%s</span> ' +
               '<span class="french">%s</span>' +
               '</p>' \
                % (example['en'], example['fr']) (3)

        for warning in idiom.warnings:
            note_field += '<p class="warning">%s<p>' % warning

        note.fields[0] = english_field (4)
        note.fields[1] = french_field
        note.fields[2] = examples_field
        note.fields[3] = note_field

        print "{\nEnglish: %s,\nFrench: %s,\nExamples: %s,\nNotes: %s}" % (
            note.fields[0], note.fields[1], note.fields[2], note.fields[3])

        # Set the tags (and add the new ones to the deck configuration
        tags = "idiom"
        note.tags = col.tags.canonify(col.tags.split(tags))
        m = note.model()
        m['tags'] = note.tags
        col.models.save(m)

        # Add the note
        col.addNote(note)

    # Save the changes to DB
col.save() (5)| 1 | Load the collection from the local disk. |
| 2 | The code reflects the Anki terminology (note, card, field, deck, tag, etc). If some term are unclear to you, check the official documentation. |
| 3 | CSS classes defined in the note type could be used to stylize our cards. Unlike the desktop application, HTML is not escaped. |
| 4 | The order of the fields should follow the same order as defined in the GUI. |
| 5 | Without the explicit call to the save method, the flashcards would not be saved to disk. Indeed, the Anki application schedules a task every 5 minutes to call this method. |
The function highlight_qualifier used in the previous code is defined like this:
def highlight_qualifier(text):
    """ Surround text in parenthesis with a stylized HTML tag. """
    return re.sub(r'[(](.*?)[)]', r'<span class="qualifier">(\1)</span>', text)
Rerun the program and open Anki again. You should see thousands of new card to study! (Go to "Browse" and select the "idiom" tag to see them all).
Our case study is finished. We have converted an ebook purchased online into thousands of flashcards with just one hundred line of code. In the next case study, we are going to create flashcards for the most common words in a language (the first step in practice before learning idioms but this use case is far more complex to automate, the reason why we invert the order in this post).
Case Study: Learn the 5000 most frequent words
Learning the vocabulary of a new language is probably one the best use case for Anki. Many famous polyglot use it daily to practice their vocabulary. To help us identify the list of frequent words in our target language, you can buy a frequency book on Amazon, or you can use free resources like Wikipedia: https://en.wiktionary.org/wiki/Wiktionary:Frequency_lists.
In this post, we are targeting the English language and will use Wikipedia.
The frequency list
Wikipedia currently offers multiple frequency lists based on different sources: films, project Gutenberg containing thousand of freely available classic romans, and even the integral of the Simpsons episodes. The lists are split in several pages (1-999, 1000-1999, and so on). By using the browser developer tool, we could easily extract the HTML to create a single HTML file containing the entire list. Here is a sample of the extracted list based on the project Gutenberg:
<table>
<thead>
<tr>
<td><b>Rank</b></td>
<td><b>Word</b></td>
<td><b>Count (per billion)</b></td>
</tr>
</thead>
<tbody>
<tr>
<td>1</td>
<td><a href="/wiki/the" title="the">the</a></td>
<td>56271872</td>
</tr>
<tr>
<td>2</td>
<td><a href="/wiki/of" title="of">of</a></td>
<td>33950064</td>
</tr>
<tr>
<td>3</td>
<td><a href="/wiki/and" title="and">and</a></td>
<td>29944184</td>
</tr>
... <!-- 39 997 other entries -->
</tbody>
</table>| Like your browser, most HTML parsers are very tolerant concerning HTML syntax. We don’t need to create a perfectly valid HTML document to be able to parse it. We will continue to use the Python language, and its most popular HTML parser BeautifulSoup. |
Here is a basic program to parse this HTML file and generate a csv file:
#/usr/bin/python

from bs4 import BeautifulSoup
import sys

if len(sys.argv) != 2:
  print("Usage: python $0 <file.html>")
  sys.exit(1)


html_file = sys.argv[1]
with open(html_file, 'r') as input_file:
    html_doc = input_file.read()
    soup = BeautifulSoup(html_doc, 'html.parser')
    for tr in soup.select('tbody tr'):
      cells = tr.find_all('td')
      print(','.join(c.get_text() for c in cells))
To convert the previous HTML file to a CSV file, launch the program using the command:
$ python html2csv.py 40000_frequency_list_gutenberg.html > \
      40000_frequency_list_gutenberg.csv
Project Gutenberg is a wonderful place to find famous old roman but we could miss usual words nowadays, so we do the same task with the TV frequency list. This results in two files 40000_frequency_list_gutenberg.csv and 40000_frequency_list_tv.csv having most of the words in common but with different rankings. We need to merge the two list.
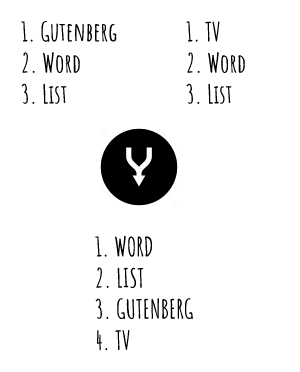
Here is a small program to produce a unique CSV file containing only two fields: the rank and the word.
import sys
import codecs
import operator


# Contains the merge of the two lists.
frequencies = {}
# word: [rank_1, rank_2] if present in both files


def fill_words(filename):
    global frequencies

    for line in codecs.open(filename, "r", "utf-8"):
        (rank, word, frequency) = line.split(",")
        if not word in frequencies:
            frequencies[word] = []
        frequencies[word].append(int(rank))


# Read the files to parse
fill_words("40000_frequency_list_gutenberg.csv")
fill_words("40000_frequency_list_tv.csv")


# Calculate the average rank (ex: TV 30250, Gutenberg 27500 => 28875)
frequencies_avg = {}
for word, ranks in frequencies.iteritems():
    rank = int(reduce(lambda x, y: x + y, ranks) / len(ranks))
    frequencies_avg[word] = rank


# Sort the dictionary by value (rank)
frequencies_sorted = sorted(frequencies_avg.items(),
                       key=operator.itemgetter(1))


# Output a new CSV with incrementing rank
# (previous ranking calculation produces words with the same rank)
i = 0
for word, rank in frequencies_sorted:
    i += 1
    print("%s,%s" % (i, word))
To generate the new list:
$ python calculate_frequency_list.py > my_english_frequency_list.csv
If we inspect the resulting file, we notice numerous unwanted words such as "Mickey." Let’s remove them by updating our program:
def filter(word):
    # Remove Proper name (ex: Mickey)
    if word[0].isupper():
        return True
    # Remove single length word (ex: I)
    if len(word) == 1:
        return True
    # Remove abbreviation (ex: can't)
    if "'" in word:
        return True
    # Remove word containing a digit (ex: 8th)
    if any(char.isdigit() for char in word):
        return True
    # Remove abbreviation ending with . (ex: Mr.)
    if "." in word:
        return True
    return False

frequencies_avg = {}
for word, ranks in frequencies.iteritems():
    if filter(word): # New
        continue     # New
    rank = int(reduce(lambda x, y: x + y, ranks) / len(ranks))
    frequencies_avg[word] = rank
We still have not finished. If we look again at the output, we notice words sharing the same radical (ex: bill/bills, displease/displeased). These words could not be filtered as before but could only be removed at the end of the program (when we are sure we have found the different syntaxes).
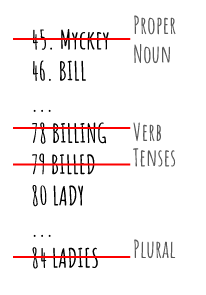
So, let’s update our program to add the following code just before printing the result:
frequencies_avg_copy = frequencies_avg.copy() # Work on a copy
                                              # to delete during iteration
for word, rank in frequencies_avg_copy.iteritems():

    if word.endswith("ing"): # eat/eating
        adverb_word = word
        verb = word[:len(word) - 3]
        if adverb_word in frequencies_avg and verb in frequencies_avg:
            del frequencies_avg[adverb_word]

    if word.endswith("ies"): # lady/ladies
        third_person_verb = word
        verb = word[:len(word) - 3] + "y"
        if third_person_verb in frequencies_avg and verb in frequencies_avg:
            del frequencies_avg[third_person_verb]

    if word.endswith("ed"):
        adjective_word = word

        word1 = word[:len(word) - 2] # fill => filled
        if adjective_word in frequencies_avg and word1 in frequencies_avg:
            del frequencies_avg[adjective_word]

        word2 = word[:len(word) - 1] # displease => displeased
        if adjective_word in frequencies_avg and word2 in frequencies_avg:
            del frequencies_avg[adjective_word]

    if word.endswith("s"): # bill/bills
        plural_word = word
        singular_word = word[:len(word) - 1]
        if plural_word in frequencies_avg and singular_word in frequencies_avg:
            del frequencies_avg[plural_word]
The definitions
When learning a new language, it is better to left out completely your tongue language of our flashcards. Popular flashcard application Memrise does exactly that. Instead, we will include the definitions written in the same language as the word. To do so, we will use Wiktionary. Like its sister project Wikipedia, Wiktionary is run by the Wikimedia Foundation, and is edited collaboratively by volunteers. This dictionary is available in 172 languages and probably contains the most exhaustive list of words (500 000 words for the english dictionary!).
Reading the data
Wiktionary, like other Wikimedia projects, offers a REST API to retrieve a single page. The API is still in active development. Another option is to exploit the generated dumps. Indeed, Wikimedia hosts numerous dumps of its database (useful for example in natural language processing tasks or for reseach project). The one that interest us is the enwiktionary dump, in particular the first archive described as "Articles, templates, media/file descriptions, and primary meta-pages".
Once downloaded, we extract the tar.gz archive to find a single XML file with a size of 4,5 GB!
Parsing the Wiktionary dump
The downloaded file contains every dictionary written in the english language (English ⇒ English, Spanish ⇒ English, …). To avoid parsing the whole file many times, we need to extract only the relevant information.

Here is a preview of its content:
<mediawiki xmlns="http://www.mediawiki.org/xml/export-0.10/"
xmlns:xsi="http://www.w3.org/2001/XMLSchema-instance"
xsi:schemaLocation="http://www.mediawiki.org/xml/export-0.10/
http://www.mediawiki.org/xml/export-0.10.xsd"
version="0.10" xml:lang="en">
<page>
<title>free</title>
<ns>0</ns>
<id>19</id>
<revision>
<id>38832709</id>
<parentid>38719386</parentid>
<timestamp>2016-06-17T20:55:44Z</timestamp>
<contributor>
<username>DTLHS</username>
<id>794618</id>
</contributor>
<comment>/* English */</comment>
<model>wikitext</model>
<format>text/x-wiki</format>
<text xml:space="preserve">{{also|-free}}
==English==
{{wikipedia|dab=free}}
===Etymology===
From {{etyl|enm|en}} {{m|enm|free}}, {{m|enm|fre}}, {{m|enm|freo}},
from {{etyl|ang|en}} {{m|ang|frēo||free}}, from {{etyl|gem-pro|en}}
{{m|gem-pro|*frijaz||free}}, from {{etyl|ine-pro|en}}
{{m|ine-pro|*preyH-||to be fond of}}. Cognate with West Frisian
{{m|fy|frij||free}}, Dutch {{m|nl|vrij||free}},
Low German {{m|nds|free||free}},
German {{m|de|frei||free}},
Danish {{m|da|fri||free}}.
The verb comes from {{etyl|enm|en}} {{m|enm|freen}}, {{m|enm|freoȝen}},
from {{etyl|ang|en}} {{m|ang|frēon}}, {{m|ang|frēoġan||to free; make free}}.
===Pronunciation===
* {{IPA|/fɹiː/|lang=en}}
* {{audio|en-us-free.ogg|Audio (US)|lang=en}}
* {{audio|En-uk-free.ogg|Audio (UK)|lang=en}}
* {{rhymes|iː|lang=en}}
[[File:Free Beer.jpg|thumb|A sign advertising '''free''' beer
(obtainable without payment)]]
[[File:Buy one, get one free ^ - geograph.org.uk - 153952.jpg|thumb|A
"buy one get one '''free'''" sign at a flower stand
(obtainable without additional payment)]]
[[File:Berkeley Farms Fat-Free Half & Half.jpg|thumb|This food product
is labelled "fat '''free'''", meaning it contains no fat]]
===Adjective===
{{en-adj|er}}
# {{label|en|social}} [[unconstrained|Unconstrained]].
#: {{ux|en|He was given '''free''' rein to do whatever he wanted.}}
#* {{quote-book|year=1899|author={{w|Stephen Crane}}
|title=[[s:Twelve O'Clock|Twelve O'Clock]]|chapter=1
|passage=There was some laughter, and Roddle was left '''free'''.”}}
...
<sha1>sbauh4n08a6ktob42jxeoye85e0w9tb</sha1>
</revision>
</page>
<!-- Million of pages... -->
</mediawiki>When parsing such a large file, we should be careful and not load the full file in memory. A solution is to use a SAX Parser. But unlike a DOM parser, it is not possible to simply traverse the XML document to extract the relevant information. SAX Parsers are event-driven. We need to listen to each new tag, each character text, and so on. We also need to remember our position inside the file to answer question such as "Does the text correspond to the title tag?".
The following program extracts the id, title, and text and generates another XML file containing only the English words. The result is a smaller file (less than 300 Mb), that does not take 45 minutes to be parsed on my machine…
"""
Parses a XML wiktionary dump using a SAX parser (humongous file!).
Produces another XML files containing only the english words
with their id and the full text.
"""

import xml.sax
import codecs
import sys


class ABContentHandler(xml.sax.ContentHandler):

    def __init__(self, frequency_list = None):
        xml.sax.ContentHandler.__init__(self)
        self.frequency_list = frequency_list

        # Flag to determine our current position inside the XML file
        self.in_page = False
        self.in_id = False
        self.in_title = False
        self.in_text = False

        # Variables to hold information about the processed element
        self.id = None
        self.title = None
        self.text = None

        # Counter to count the number of English word found
        self.filtered_words = 0
        self.all_words = 0

    def startElement(self, name, attrs):
        if name == "page":
            self.in_page = True
        if self.in_page and name == "id":
            self.in_id = True
        if self.in_page and name == "title":
            self.in_title = True
        if self.in_page and name == "text":
            self.in_text = True
            self.text = ""

    def characters(self, content):
        if self.in_title:
            self.title = content
        elif self.in_id:
            self.id = content
        elif self.in_text:
            self.text += content

    def _append_word(self):
        global output_file
        self.filtered_words += 1
        if self.frequency_list:
            self.frequency_list[self.title] = True
        output_file.write("  <entry>\n")
        output_file.write("    <id>%s</id>\n" % self.id)
        output_file.write("    <title>%s</title>\n" % self.title)
        output_file.write("    <text xml:space=\"preserve\"><![CDATA[\n")
        output_file.write("%s\n" % self.text)
        output_file.write("    ]]></text>\n")
        output_file.write("  </entry>\n")

    def endElement(self, name):
        if name == "page":
            self.in_page = False
            self.all_words += 1

            # Remove non-english words
            # Remove category title (ex: Index:Spanish)
            # Remove words beginning by an Uppercase BUG
            if "==English==" in self.text[:200] \
                    and not ":" in self.title \
                    and self.title != self.title.title():

                if not self.frequency_list \
                   or self.title in self.frequency_list:
                    self._append_word()

        if self.in_page and name == "title":
            self.in_title = False
        if self.in_page and name == "id":
            self.in_id = False
        if self.in_page and name == "text":
            self.in_text = False

if __name__ == "__main__":

    # Read the frequency to filter the words
    frequency_list = {}
    for line in codecs.open("my_english_frequency_list.csv", "r", "utf-8"):
        (rank, word) = line.strip().split(',')
        frequency_list[word] = False

    # Read the
    output_file = codecs.open("enwiktionary-frequency.xml", "w", "utf-8")
    output_file.write("<dictionary>\n")
    source = open("enwiktionary-20160720-pages-articles-multistream.xml")
    xml.sax.parse(source, ABContentHandler(frequency_list))
    output_file.write("</dictionary>\n")
    output_file.close()

# Results:
# - 34 307 common words extracted from 615 209 English words
#   among a total of 5 113 338 words.
When running the program, a new file enwiktionary-frequency.xml appears in the current folder. Here is an excerpt of its content:
<dictionary>
  <entry>
    <id>45268</id>
    <title>dictionary</title>
    <text xml:space="preserve"><![CDATA[
{{also|Dictionary}}
==English==
{{wikipedia|dab=Dictionary (disambiguation)|Dictionary}}

===Etymology===
{{PIE root|en|deyḱ}}
{{etyl|ML.|en}} {{m|la|dictionarium}},
from {{etyl|la|en}} {{m|la|dictionarius}},
from {{m|la|dictio||speaking}}, from {{m|la|dictus}},
perfect past participle of {{m|la|dīcō||speak}} + {{m|la|-arium||room, place}}.

===Pronunciation===
* {{a|RP}} {{IPA|/ˈdɪkʃ(ə)n(ə)ɹɪ/|lang=en}}
* {{a|GenAm|Canada}} {{enPR|dĭk'shə-nĕr-ē}}, {{IPA|/ˈdɪkʃənɛɹi/|lang=en}}
* {{audio|en-us-dictionary.ogg|Audio (US)|lang=en}}
* {{audio|en-uk-dictionary.ogg|Audio (UK)|lang=en}}
* {{hyphenation|dic|tion|ary|lang=en}}

===Noun===
{{en-noun|dictionaries}}

# A [[reference work]] with a list of [[word]]s from one or more languages,
normally ordered [[alphabetical]]ly, explaining each word's meaning,
and sometimes containing information on its etymology, pronunciation,
usage, translations, and other data.
...
    ]]></text>
  </entry>
  <entry>
    <id>794618</id>
    <title>free</title>
    <text xml:space="preserve"><![CDATA[
      ...
    ]]></text>
  </entry>
  ...
</dictionary>

===Etymology===
This file could quickly be parsed (10s on my local machine). The next step is to parse the value of the text tag to extract all relevant information.
Parsing the x-wiki text to generate a JSON file
The <text> tag contains a x-wiki document whose main syntax is defined here. Wikipedia add a lot of semantic above this syntax through the use of numerous labels. I didn’t find a document that describes the Wiktionary syntax, so we need to revert to reverse engineering.
Here is an shortened example of a x-wiki document (about the word keyboard):
{{also|Keyboard}}
==English== (1)
{{wikipedia|dab=keyboard|lang=en}}
[[Image:Player piano keyboard.jpg|thumb|100px|A piano keyboard]]

===Etymology===
From {{compound|key|board|lang=en}}.

===Pronunciation===
* {{a|US}} {{IPA|/ˈkibɔ˞d/|lang=en}}
* {{a|UK|Australia}} {{IPA|/ˈkiːbɔːd/|lang=en}}
* {{audio|En-us-keyboard.ogg|Audio (US)|lang=en}}

===Noun=== (2)
{{en-noun}}

# {{lb|en|computing|etc.}} A set of keys used to operate
a [[typewriter]], [[computer]] etc.
# {{lb|en|music}} A component of many [[instruments]] including the
[[piano]], [[organ]], and [[harpsichord]] consisting of usually black
and white keys that cause different tones to be produced when struck.
# {{lb|en|music}} A device with keys of a musical keyboard, used to control
[[electronic]] sound-producing devices which may be built into or separate
from the keyboard device.

====Synonyms====
* {{sense|electronic musical device}} {{l|en|electronic keyboard}} (3)

====Related terms====
* {{l|en|key}}
* {{l|en|keypad}}

====Translations==== (4)
{{trans-top|set of keys used to operate a typewriter, computer etc.}}
* Breton: {{t|br|klavier|m}}
* Dutch: {{t+|nl|toetsenbord|n}}, {{t+|nl|klavier|n}}
* French: {{t+|fr|clavier|m}} (3)
{{trans-bottom}}

{{trans-top|component of many instruments}}
* Breton: {{t|br|klavier|m}}
*: Mandarin: {{t+|cmn|鍵盤|sc=Hani}}, {{t+|cmn|键盘|tr=jiànpán|sc=Hani}}
* Dutch: {{t+|nl|klavier|n}}, {{t+|nl|keyboard|n}}
* French: {{t+|fr|clavier|m}}
* German: {{t+|de|Tastatur|f}}, {{t+|de|Klaviatur|f}}, {{t+|de|Manual|n}}
{{trans-bottom}}

===Verb=== (2)
{{en-verb}}

# {{lb|en|intransitive}} To [[type]] on a [[computer]] keyboard.
#: '' '''Keyboarding''' is the part of this job I hate the most.''

====Translations==== (4)
{{trans-top|to type in}}
*: Mandarin: {{t+|cmn|打字|tr=dǎzì|sc=Hani}}
* French: {{t+|fr|clavier}}
* Greek: {{t|el|πληκτρογραφώ}}, {{t+|el|πληκτρολογώ}}
{{trans-bottom}}

==Dutch== (1)

===Pronunciation===
* {{audio|Nl-keyboard.ogg|Audio|lang=nl}}
* {{hyphenation|key|board|lang=nl}}

===Etymology===
{{borrowing|en|keyboard|lang=nl}}.

===Noun===
{{nl-noun|n|-s|keyboardje}}

# {{lb|nl|computing|music}} {{l|en|keyboard}}

====Synonyms====
* {{sense|computing}} {{l|nl|toetsenbord}}
| 1 | A wiktionary entry contains the text of multiple dictionaries (English-English, English-Dutch). Only the English-English dictionary is relevant when learning the English language. |
| 2 | A given word could be used as a noun, a verb, etc. We need to extract the definition for each type while keeping note of the type. |
| 3 | Label syntax such as {{t+|fr|clavier|m}} is used exhaustively inside the wiki text. Most of the content is present inside these labels but the syntax is not easily parseable. |
| 4 | There are many translation blocks. Often, the first one is the only translation we are interested. |
On this example, the definitions are easily parseable but not all the words are so simple in practice. Consider the word 'car':
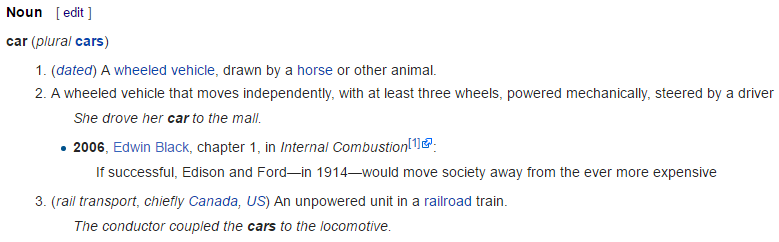
Here the same content as x-wiki:
====Noun====
{{en-noun}}

# {{lb|en|dated}} A [[wheeled]] [[vehicle]],
drawn by a [[horse]] or other animal.
# A wheeled vehicle that moves independently,
with at least three wheels, powered mechanically,
steered by a driver
#: ''She drove her '''car''' to the mall.'' (1)
#* {{quote-book|year=2006|author=[[w:Edwin Black|Edwin Black]] (2)
|title=Internal Combustion
|chapter=1|url=http://openlibrary.org/works/OL4103950W
|passage=If successful, Edison and Ford—in 1914—
would move society away from the ever more expensive}}
# {{lb|en|rail transport|chiefly|North America}} An unpowered
unit in a [[railroad]] train.
#: ''The conductor coupled the '''cars''' to the locomotive.''
| 1 | Quotes could be on a line starting with #:, be surrounded with '' |
| 2 | While other quotes could be on a line containing a label with the attribute passage containing the quote text. |
This is only one example of subtlety among many others. Wiktionary syntax is full of surprise but also full of interesting content.
So, we will create another Python program to parse the previously generated XML file. The aim of to generate a structured JSON file with only the required information. For example:
{
  "title":"car",
  "id":"3184799",
  "ipa":"/k\u0251\u02d0/",
  "rank":683,

  "audio":"En-uk-a car.ogg",
  "audio_url":"http://upload.wikimedia.org/wikipedia/ \
               commons/3/31/En-uk-a car.ogg",

  "images":[
    {
      "description":"Diagram for the list (42 69 613). The [[car",
      "filename":"Cons-cells.svg",
      "thumb_url":"http://upload.wikimedia.org/wikipedia/commons/ \
                   thumb/1/1b/Cons-cells.svg/600px-Cons-cells.svg",
      "url":"http://upload.wikimedia.org/wikipedia/commons/1/1b/Cons-cells.svg"
    }
  ],

  "types":[
    {
      "type":"Noun",
      "definitions":[
        { "text":"A wheeled vehicle, drawn by a horse or other animal." },
        {
          "text":"A wheeled vehicle that moves...",
          "quotations":[
            "She drove her <em>car</em> to the mall."
          ]
        },
        {
          "text":"(rail transport, chiefly, North America) \
                  An unpowered unit in a railroad train.",
          "quotations":[
            "The conductor coupled the <em>cars</em> to the locomotive."
          ]
        }
       ]
     }
  ],

  "synonyms":[
    "(private vehicle that moves independently) auto, motorcar",
    "(non-powered part of a train) railcar, wagon"
  ],

  "translations":[
    "char",
    "auto",
    "automobile",
    "voiture"
  ]
}
The code behind this program contains a lot of parsing logic. The result is not the most beautiful code that I have written and I am not going to present it in this post but if you are curious, the full listing is available in the project repository in GitHub.
Creating the flashcards
Unlike the previous case study on idioms, creating flashcards for vocabulary is most complicated for different reasons:
-
Some word contains more than ten definitions or examples. Should we add them all?
-
Some word would benefit from a memorable image (ex: the word "dog")
-
Some word have a pronunciation sound in Wiktionary
Moreover, which type of notes should we select in Anki? The "Basic (with reversed card)" is probably too simplistic. Why not find the word from the image only, the sound only, a given definition, or ask for the translation of the word, etc. There are so many possibilities.
All of these points highlight that we cannot write a program to automatically take all the decisions. So, we will create a basic web application to display the definitions, the examples, and a list of candidate images retrieved from Google Images. Each of these elements will be accompanied with several checkboxes to choose the most relevant definitions, examples and select the most memorable picture.
The Assistant
The assistant reads the JSON dictionary file created previously, displays its content to the user and save a new annotated JSON file containing the choices made by the user. We will return to this file later.
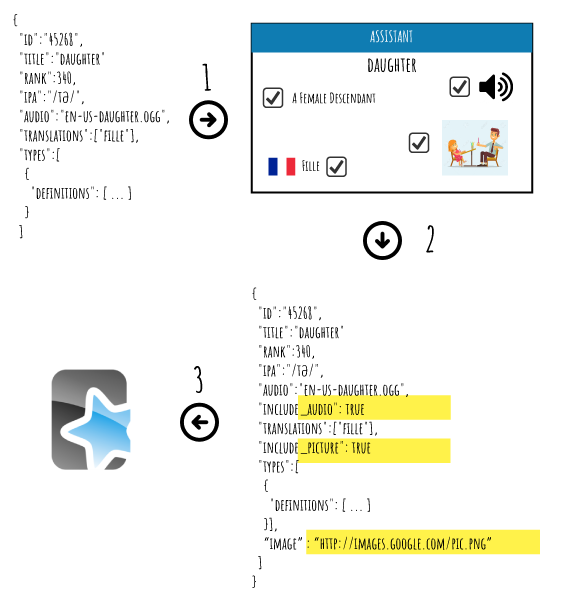
Here is a screenshot of this application:
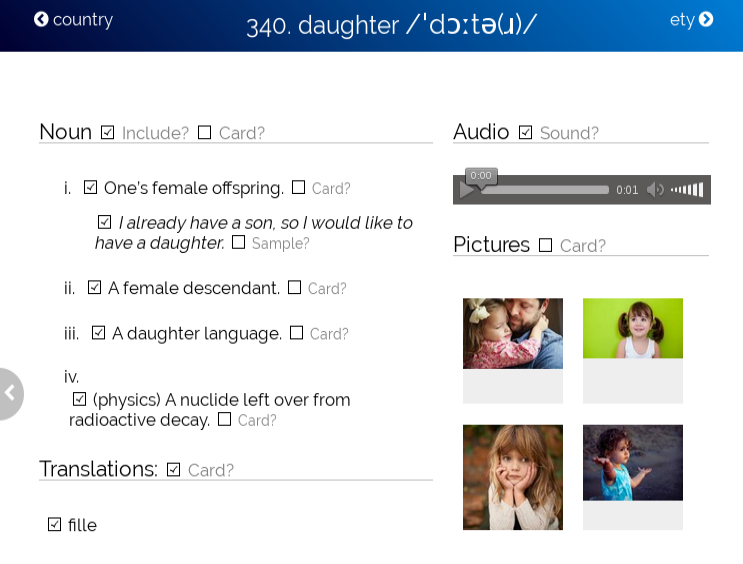
To launch locally the web application, you need to first retrieve the source and build the archive: (JDK 1.7 > required)
$ git clone https://github.com/julien-sobczak/anki-scripting.git
$ cd anki-scripting/anki-vocabulary-assistant
$ mvn clean package
Then, run the following command to start the web application:
$ java \
  -DdeveloperKey=<YOUR_DEVELOPER_KEY> \
  -Dcx=<YOUR_CONTEXT_KEY> \
  -DoutputDir="~/output/" \
  -DdictionaryFile="anki-usecase-enfrequency/resources/mywiktionary.json" \
  -jar target/anki-vocabulary-assistant-0.0.1.jar \
|
Google CSE API
The application uses the Google Custom Search API (GSE) to retrieve a list of images related to the selected word, so you need credentials to access the API. Google limits to 100 free searches per day. Please visit the official site for more information. |
Open your browser and enter the URL http://localhost:8080. You should have the same output as the previous screenshot.
|
Requisites
In this part, we will use Spring Boot and the Java language for the backend and AngularJS for the frontend. If these technologies are new to you, do not hesitate to read a Getting Starting on these technologies first. You do not need to be expert in these technologies to follow the code along. The presented code uses only basic features of these frameworks. |
The entry point is the class Application:
package fr.imlovinit.anki.vocabulary.assistant;

import fr.imlovinit.anki.vocabulary.assistant.configuration.AppConfiguration;
import org.springframework.boot.SpringApplication;
import org.springframework.boot.autoconfigure.SpringBootApplication;
import org.springframework.context.annotation.Import;

@SpringBootApplication
@Import(AppConfiguration.class)
public class Application {

        public static void main(String[] args) {
                SpringApplication.run(Application.class, args);
        }

}
The application defines a unique web controller ApiController that loads the full dictionary in-memory at start-up:
package fr.imlovinit.anki.vocabulary.assistant.controller;

import fr.imlovinit.anki.vocabulary.assistant.model.Dictionary;
import org.springframework.beans.factory.annotation.*;
import org.springframework.web.bind.annotation.*;

import javax.annotation.PostConstruct;

@RestController
@RequestMapping("/api")
public class ApiController {

    private Dictionary dictionary;

    @Value("${outputDir}")
    private String outputDir;

    @Value("${dictionaryFile}")
    private String dictionaryFile;

    @PostConstruct
    public void init() {
        dictionary = new Dictionary(dictionaryFile);
    }

    // ...
]
The class Dictionary is a wrapper around the JSON document generated at the end of the previous section:
package fr.imlovinit.anki.vocabulary.assistant.model;

import com.fasterxml.jackson.databind.node.ArrayNode;
import com.fasterxml.jackson.databind.node.ObjectNode;
import com.fasterxml.jackson.databind.node.TextNode;
import fr.imlovinit.anki.vocabulary.assistant.util.Json;

import java.io.IOException;

public class Dictionary {

    private String filepath;
    private ArrayNode dictionary;

    public Dictionary(String filepath) {
        this.filepath = filepath;
        this.dictionary = loadDictionary();
    }

    private ArrayNode loadDictionary() {
        try {
            ArrayNode rootNode = Json.readFromFile(filepath, ArrayNode.class);
            return rootNode;
        } catch (IOException e) {
            e.printStackTrace();
        }
        return null;
    }

}
You could access any word from its rank using the method searchWord:
/**
 * Search inside the full JSON dictionary after the given identifier.
 * Only the rank could be used as identifier for now.
 */
public Word searchWord(String identifier) {
    ObjectNode json = (ObjectNode) dictionary.get(
      Integer.parseInt(identifier) - 1);
    return new Word(json);
}
This method is exposed in REST:
@RestController
@RequestMapping("/api")
public class ApiController {

    private Dictionary dictionary;

    @RequestMapping(path = "/word/{identifier}",
                    method = RequestMethod.GET,
                    produces = "application/json")
    public ObjectNode getWord(
                    @PathVariable String identifier) {
        return dictionary.searchWord(identifier).asJsonNode();
    }

    // ...
}
For example, if you want to retrieve the information about the word daughter (340), enter the following URL into your browser: http://localhost:8080/api/word/340
{
  "id":"45268",
  "title":"daughter"
  "rank":340,
  "ipa":"/ˈdɔːtə(ɹ)/",
  "audio":"en-us-daughter.ogg",
  "translations":["fille"],
  "types":[
    {
      "definitions": [ ... ]
    }
  ]
}
We could now create an application based on AngularJS 1.x and hosted in the same project for convenience. By default, every resource present under the directory src/main/resources/public will be exposed as static resources by Spring Boot. So, let’s create the index page:
<!doctype html>
<html lang="fr" ng-app="app">
<head>
    <meta charset="utf-8">
    <title>Anki Vocabulary Assistant</title>
    <!-- some CSS code -->
    <script src="libs/angularjs/1.5.8/angular.js">
    </script>
    <script src="app.js"></script>
</head>
<body ng-controller="WordController">

    <header>
        <h1>
          .
          <span class="ipa"></span>
        </h1>
    </header>

    <div id="container">

        <div id="dictionary">
            <section ng-repeat="type in json.types">
                <h2>
                    <label></label>
                    <input type="checkbox"
                      ng-click="type.include = !type.include"
                      ng-checked="type.include" /> <!-- <1> -->
                    <span class="label">Include?</span>
                </h2>
                <ol class="definitions">
                    <li ng-repeat="definition in type.definitions">
                        <input type="checkbox"
                          ng-click="definition.include = !definition.include"
                          ng-checked="definition.include" /> <!-- <1> -->
                        <span class="definition"></span>
                        <!-- quotations -->
                    </li>
                </ol>
            </section>

            <!-- synonyms, translations, ... -->
        </div>

        <div id="media">
            <section ng-if="json.audio">
                <h2>
                    Audio
                    <input type="checkbox"
                        ng-click="json.audio.include = !json.audio.include"
                        ng-checked="json.audio.include"
                        ng-if="json.audio" /> (1)
                    <span class="label">Sound?</span>
                </h2>
                <div id="audio">
                    <audio id="audio_controller" controls>
                        <source ng-src=""
                                type="audio/ogg"
                                ng-if="json.audio.url.endsWith('.ogg') !== -1">
                        <source ng-src=""
                                type="audio/mpeg"
                                ng-if="json.audio.url.endsWith('.mp3') !== -1">
                        Your browser does not support the audio element.
                    </audio>
                </div>
            </section>
        </div>
    </div>
</body>
</html>| 1 | We add a property include to true when the user select an element. |
The HTML is self-descriptive. Let’s inspect the JavaScript code used to bootstrap the AngularJS application:
angular.module('app', [])

.controller('WordController', function($scope, $http, $document) {

  $scope.word = undefined;

  // Display a word.
  function showWord(rank) {

    $http.get('/api/word/' + rank).then(function(json) { (2)
      $scope.json = json.data;
      $scope.word = $scope.json.title;
    });

    window.location.hash = '#' + $scope.rank;
  }

  // Inspect the Hash to determine the word to display
  if (window.location.hash) { (1)
    $scope.rank = Number(window.location.hash.substring(1));
  } else {
    $scope.rank = 1;
  }
  showWord($scope.rank);
});
}]);| 1 | At initialization, we check the URL to determine the word to load before calling the main method showWord. |
| 2 | We emit an HTTP request to retrieve the JSON containing the word information. The result is stored in the model to be accessible by the view. |
The user could then check every definition, quotation, sound that interesting him. Once this is done, the user presses the touch 'Enter' to save the current word and trigger the next word loading.
So, let’s add the code to listen the key press:
// ...
.controller('WordController', function($scope, $locale, $http, $document) {

  $scope.word = undefined;

  // ...

  // Assign hotkeys
  $document.bind("keypress", function(event) {
    code = event.charCode || event.keyCode;
    switch (code) {
    case 13: // Enter
        $scope.save();
        break;
    }
  });

  // Save the currently edited JSON document before moving to the next word
  $scope.save = function() {
    $http.put('/api/word/' + $scope.rank, $scope.json).then(function() {
        $scope.showNextWord();
    });
  };

  // Advance the position before calling the previously covered method
  $scope.showNextWord = function() {
    $scope.rank++
    showWord($scope.rank);
  };

})
The code makes an HTTP request to a new service we need to define in our controller ApiController:
@RestController
@RequestMapping("/api")
public class ApiController {

    private Dictionary dictionary;

    // ...

    @RequestMapping(path = "/word/{identifier}",
                    method = RequestMethod.PUT,
                    consumes = "application/json")
    public void saveWord(
            @PathVariable String identifier,
            @RequestBody String jsonWord) throws IOException {

        // Parse the input
        ObjectNode node = Json.readFromString(jsonWord,
            ObjectNode.class); (1)
        Word newWord = new Word(node);

        // Save picture
        newWord.save(outputDir); (2)
    }

}| 1 | We parse the input JSON before passing it to the constructor of the class Word. Like the class Dictionary, this class acts as a Wrapper around the raw JSON document. |
| 2 | We use the method save on this object to persist the selection of the user. |
The main logic is encapsulated inside the class Word. Let’s see its definition:
package fr.imlovinit.anki.vocabulary.assistant.model;

import com.fasterxml.jackson.databind.node.ArrayNode;
import com.fasterxml.jackson.databind.node.ObjectNode;
import fr.imlovinit.anki.vocabulary.assistant.util.Json;

import java.io.*;
import java.net.URL;

public class Word {

   private ObjectNode word;

   public Word(ObjectNode json) {
       this.word = json;
   }

   public String getDescriptiveName() {
       return word.get("rank").asInt() + "-" + word.get("title").asText();
   }

   public void save(String outputDir) throws IOException {
       downloadAudio(outputDir); (1)
       saveDictionaryEntry(outputDir); (2)
   }

   private void saveDictionaryEntry(String outputDir) throws IOException {
       String filepath = outputDir + File.separator +
                         getDictionaryEntryFilename();
       Json.writeToFile(asJsonNode(), filepath);
   }

   private void downloadAudio(String outputDir) throws IOException {
       String audioUrl = getAudioUrl();

       if (audioUrl != null) {
           String filepath = outputDir + File.separator +
                             getAudioFilename(audioUrl);
           downloadFile(audioUrl, filepath);
       }
   }

   public String getAudioUrl() {
       // Search the selected image
       ObjectNode audio = (ObjectNode) word.get("audio");
       if (audio != null) {
           if (audio.get("include") != null &&
               audio.get("include").asBoolean()) {
               String url = audio.get("url").asText();
               return url;
           }
       }

       return null; // No audio file or not selected
   }

   private String getAudioFilename(String url) {
       String extension = extractExtension(url);
       return getDescriptiveName() + "." + extension;
   }

   private String getDictionaryEntryFilename() {
       return getDescriptiveName() + ".json";
   }

   private static String extractExtension(String url) {
       int indexDot = url.lastIndexOf('.');
       int indexPercent = url.indexOf('?', indexDot);
       String extension = indexPercent == -1 ?
          url.substring(indexDot + 1) :
          url.substring(indexDot + 1, indexPercent);
       return extension;
   }

  // Utility method to download an URL locally
  private void downloadFile(String url, String outputPath) throws IOException {

       URL link = new URL(url);

       InputStream in = new BufferedInputStream(link.openStream());
       ByteArrayOutputStream out = new ByteArrayOutputStream();
       byte[] buf = new byte[1024];
       int n = 0;
       while (-1 != (n = in.read(buf))) {
           out.write(buf, 0, n);
       }
       out.close();
       in.close();
       byte[] response = out.toByteArray();

       FileOutputStream fos = new FileOutputStream(outputPath);
       fos.write(response);
       fos.close();
   }

}| 1 | We download the sound from Wikipedia locally |
| 2 | We save the JSON to disk |
In definitive, the assistant application reads the full JSON dictionary, exposes its information through a REST API, allows the user to choose the most pertinent information before saving an annotated JSON document to disk such as the following one:
{
  "id" : "472128",
  "title" : "work",
  "rank" : 114,
  "ipa" : "/wɜːk/",
  "audio" : {
    "name" : "en-uk-work.ogg",
    "url" : "//upload.wikimedia.org/wikipedia/commons/f/ff/En-uk-work.ogg",
    "include" : true
  },
  "translations" : [
    { "text" : "oeuvre",   "include" : true },
    { "text" : "travail",  "include" : false }
  ],
  "types" : [
    {
      "type" : "Noun",
      "include" : true,
      "definitions" : [
        {
          "text" : "(heading) ''Effort.''",
          "include" : true,
          "card": true,
          "quotations" : [
            {
              "text" : "Let's get to <em>work</em>.",
              "include" : true,
              "card_sample" : false
            }
          ]
        }
      ]
    }
  ]
}
Why saving and not create the flashcards directly inside the method 'save'?
The problem is that Anki exposes only its internal API written in Python. If the backend of our application was written in Python too, we could have create the flashcards at the same time. Here, we dump the result to a file that we will need to read by another program written in Python. This is task of the Importer.
| The full source of the application is available here. |
The Importer
This aim of this Python script is to convert a collection of JSON documents (one per word) to flashcards. As for the English idioms, we will use a custom note type that we called Word that we will defined manually through Anki Desktop. The note type Word defines a long list of fields that we will used inside the card templates:
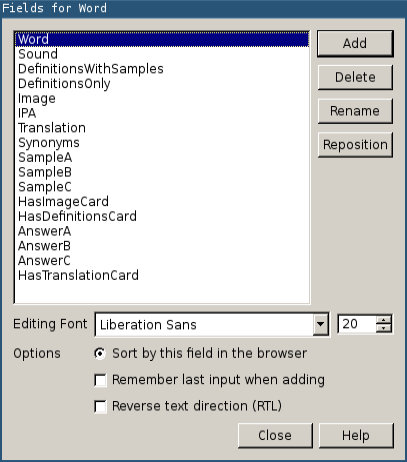
Then, we define the templates for the different possible cards.
Do you know this word?
The Card 1 displays the English word:

Where the front template is defined like this:
{{Word}}And the back template:
{{FrontSide}}

<hr id=answer>

<div class="word">
{{Word}}
{{#IPA}}<span class="ipa">{{IPA}}</span>{{/IPA}}
</div>
{{#Sound}}{{Sound}}{{/Sound}}

<br>

<div class="definitions">
{{DefinitionsWithSamples}}
</div>


{{#Translation}}
<br>
<div class="translation">
<small>FR:</small>{{Translation}}
</div>
{{/Translation}}


{{#Synonyms}}
<br>
<div class="synonyms">
<small>SYN.:</small> {{Synonyms}}
</div>
{{/Synonyms}}


{{#Image}}
<br>
{{Image}}
{{/Image}}
Check the official Anki manual to know more about the syntax used in these templates.
What is it?
The Card 2 displays the picture associated the word:
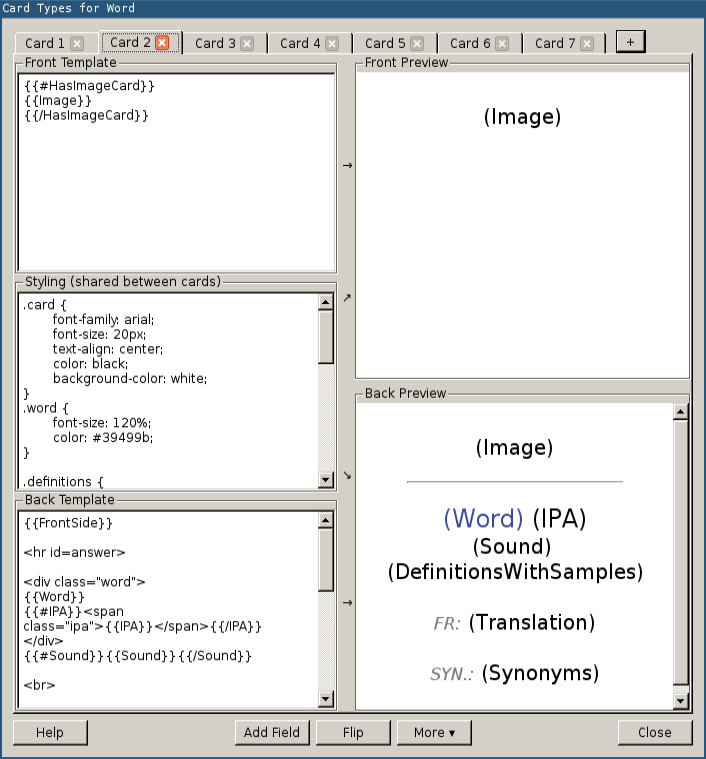
Where the front template is defined like this:
{{#HasImageCard}} (1)
{{Image}}
{{/HasImageCard}}| 1 | We need an additional field to determine if this card is required because some words have a picture but the user only want this picture to be displayed in other cards. |
And the back template:
{{FrontSide}}

<hr id=answer>

<div class="word">
{{Word}}
{{#IPA}}<span class="ipa">{{IPA}}</span>{{/IPA}}
</div>
{{#Sound}}{{Sound}}{{/Sound}}

<br>

<div class="definitions">
{{DefinitionsWithSamples}}
</div>


{{#Translation}}
<br>
<div class="translation">
<small>FR:</small> {{Translation}}
</div>
{{/Translation}}


{{#Synonyms}}
<br>
<div class="synonyms">
<small>SYN.:</small> {{Synonyms}}
</div>
{{/Synonyms}}
What is the translation?
The Card 3 displays the translation of the word:
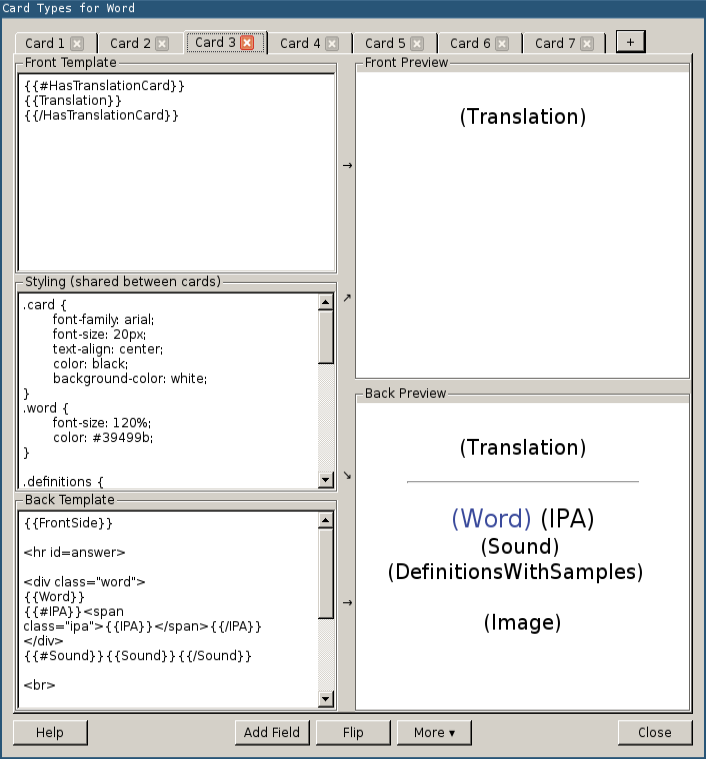
Where the front template is defined like this:
{{#HasTranslationCard}}
{{Translation}}
{{/HasTranslationCard}}
And the back template:
{{FrontSide}}

<hr id=answer>

<div class="word">
{{Word}}
{{#IPA}}<span class="ipa">{{IPA}}</span>{{/IPA}}
</div>
{{#Sound}}{{Sound}}{{/Sound}}

<br>

<div class="definitions">
{{DefinitionsWithSamples}}
</div>


{{#Image}}
<br>
{{Image}}
{{/Image}}
Complete this sentence…
The Card 4, Card 5, and Card 6 display a sentence with a missing word and the user should find it (the same concept as Cloze Deletion in Anki):

Where the front template is defined like this:
{{#SampleA}} (1)
<small>Complete</small> {{SampleA}}
{{/SampleA}}| 1 | Replace SampleA by SampleB, SampleC |
And the back template:
{{FrontSide}}

<hr id=answer>

<div class="word">
{{Word}}
{{#IPA}}<span class="ipa">{{IPA}}</span>{{/IPA}}
</div>

<br>

<div class="answer">
{{AnswerA}} (1)
</div>| 1 | Replace AnswerA by AnswerB, AnswerC |
Find the word from its definitions
The Card 7 displays a list of definitions:
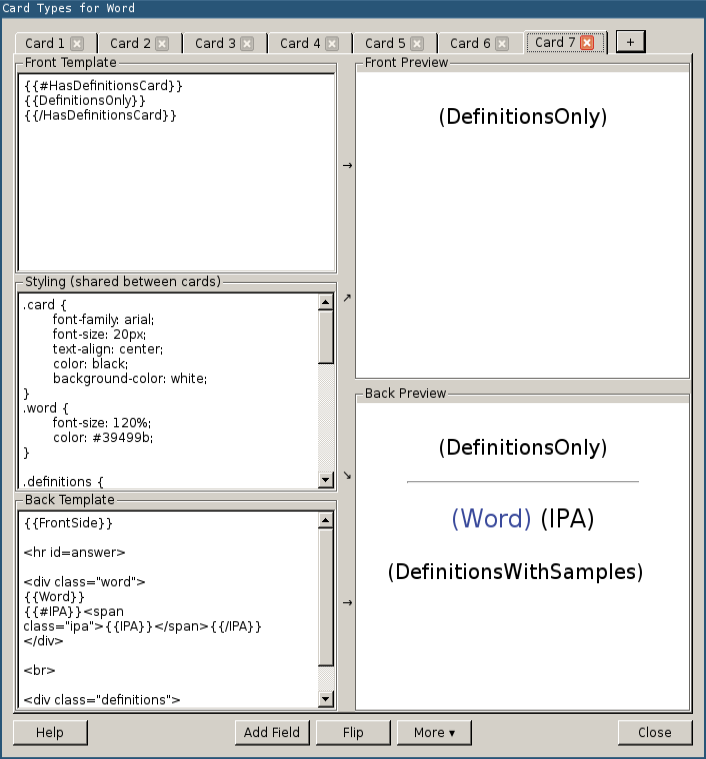
Where the front template is defined like this:
{{#HasDefinitionsCard}}
{{DefinitionsOnly}}
{{/HasDefinitionsCard}}
And the back template:
{{FrontSide}}

<hr id=answer>

<div class="word">
{{Word}}
{{#IPA}}<span class="ipa">{{IPA}}</span>{{/IPA}}
</div>

<br>

<div class="definitions">
{{DefinitionsWithSamples}}
</div>
And finally, the CSS used to stylize the cards:
.card {
        font-family: arial;
        font-size: 20px;
        text-align: center;
        color: black;
        background-color: white;
}
.word {
        font-size: 120%;
        color: #39499b;
}

.definitions {
        text-align: left;
}
.definitions em {
        color: #8a0000;
}
.definitions ul ul {
        color: #39499b;
        font-size: 90%;
}
.definitions li {
        margin-bottom: 15px;
}
.definitions li li {
        margin-top: 5px;
        margin-bottom: 5px;
}

.ipa {
        font-family: Times, serif;
        color: black;
}
small {
        color: gray;
        font-style: italic;
}
What we just did could be done through Anki internal API too but using the application is very easy and this task needs to be done only once. So, everything is ready for us to load the flashcards.
Here is the full listing. We already have seen most of the API in the previous case studies.
#!/usr/bin/env python

"""
Load a JSON file saved by the assistant to Anki.
"""

import os, json, shutil, sys

# Add Anki source to path
sys.path.append("../../anki")
from anki.storage import Collection


class Word:
    """
    Wrapper around a single JSON file
    """

    def __init__(self, doc):
        self.doc = doc

    def title(self):
        return self.doc['title']

    def rank(self):
        return self.doc['rank']

    def audio_url(self):
        if "audio" in self.doc and self.doc["audio"]["include"]:
            return self.doc["audio"]["url"]
        else:
            return None

    def definitions_with_samples(self):
        """ Returns the back text for the Card 1 """
        html = ""
        for type in self.doc["types"]:
            if "include" in type and type["include"]:
                subhtml = ""
                if "definitions" in type:
                    for definition in type["definitions"]:
                        if "include" in definition and definition["include"]:
                            subhtml += "<li>" + definition["text"]
                            if "quotations" in definition:
                                first_quotation = True
                                quotation_found = False
                                for quotation in definition["quotations"]:
                                    if "include" in quotation \
                                        and quotation["include"]:
                                        quotation_found = True
                                        if first_quotation:
                                            subhtml += "<ul>"
                                            first_quotation = False
                                        subhtml += "<li>" + \
                                                   quotation["text"] + \
                                                   "</li>"
                                if quotation_found:
                                    subhtml += "</ul>"
                            subhtml += "</li>"
                # Add the definition if at least one definition was included
                if subhtml:
                    html += "<em>" + type["type"] + "</em>" + \
                            "<ul>" + subhtml + "</ul>"

        return html

    def definitions_only(self):
        """ Returns the text for the front Card 7 """
        selected_definitions = []
        for type in self.doc["types"]:
            if "definitions" in type:
                for definition in type["definitions"]:
                    if "include" in definition and definition["include"]:
                        selected_definitions.append(definition["text"])
        if selected_definitions:
            html = "<ul>"
            for definition in selected_definitions:
                html += "<li>" + definition + "</li>"
            html += "</ul>"
            return html
        else:
            return None

    def image(self):
        if "images" in self.doc:
            for image in self.doc["images"]:
                if "include" in image and image["include"]:
                    return image["thumb_url"]
        return None

    def ipa(self):
        if "ipa" in self.doc:
            return self.doc["ipa"]
        return None

    def translation(self):
        """ Returns the translation block text includes in various cards """
        selected_translations = []
        if "translations" in self.doc:
            for translation in self.doc["translations"]:
                if "include" in translation and translation["include"]:
                    selected_translations.append(translation["text"])
        if selected_translations:
            return ", ".join(selected_translations)
        else:
            return None

    def synonyms(self):
        """ Returns the synonym block text includes in various cards """
        selected_synonyms = []
        if "synonyms" in self.doc:
            for synonym in self.doc["synonyms"]:
                if "include" in synonym and synonym["include"]:
                    selected_synonyms.append(synonym["text"])
        if selected_synonyms:
            return ", ".join(selected_synonyms)
        else:
            return None

    def samples(self):
        result = {}
        for type in self.doc["types"]:
            if "definitions" in type:
                for definition in type["definitions"]:
                    if "quotations" in definition:
                        for quotation in definition["quotations"]:
                            if "card_sample" in quotation \
                                and quotation["card_sample"]:
                                answer = quotation["text"]
                                sample = answer.replace(self.title(), "[...]")
                                result[sample] = answer
        return result

    def has_image_card(self):
        return "card_images" in self.doc and self.doc["card_images"]

    def has_definition_card(self):
        for type in self.doc["types"]:
            if "card_definitions" in type and type["card_definitions"]:
                return True
        return None

    def has_translation_card(self):
        return "card_translate" in self.doc and self.doc["card_translate"]


def load(col, filepath):
    """
    Load a single word into Anki.

    Read the word file.
    Check if a picture or sound is present in the same folder.

    :param filepath: the file path of the JSON document file
    """

    directory = os.path.dirname(filepath)
    basename = os.path.basename(filepath)

    media_directory = os.path.join(os.path.dirname(col.path),
                                  "collection.media")

    print("Opening file %s" % filepath)
    with open(filepath, 'r') as f:
        json_content = f.read()
        doc = json.loads(json_content)
        word = Word(doc)

        # We need to populate each one of the fields
        fields = {}
        fields["Word"] = word.title()

        if word.audio_url():
            filename = "%s-%s" % (word.rank(), word.title())
            possible_extensions = ['ogg', 'mp3']
            for extension in possible_extensions:
                audio_name = filename + '.' + extension
                audio_path = os.path.join(directory, audio_name)
                if os.path.exists(audio_path):
                    source_path = audio_path
                    target_path = os.path.join(media_directory, audio_name)
                    print("Copying media file %s to %s" %
                        (source_path, target_path))
                    col.media.addFile(source_path)
                    #shutil.copyfile(source_path, target_path)
                    fields["Sound"] = "[sound:%s]" % audio_name

        fields["DefinitionsWithSamples"] = word.definitions_with_samples()
        fields["DefinitionsOnly"] = word.definitions_only()

        if word.image():
            image_name = "%s-%s-thumb.jpg" % (word.rank(), word.title())
            image_path = os.path.join(directory, image_name)
            if os.path.exists(image_path):
                source_path = os.path.join(directory, image_name)
                target_path = os.path.join(media_directory, image_name)
                print("Copying media file %s to %s" %
                    (source_path, target_path))
                col.media.addFile(source_path)
                #shutil.copyfile(source_path, target_path)
                fields["Image"] = '<img src="%s">' % image_name

        if word.ipa():
            fields["IPA"] = word.ipa()
        if word.translation():
            fields["Translation"] = word.translation()
        if word.synonyms():
            fields["Synonyms"] = word.synonyms()

        samples = word.samples()
        if samples:
            sample_suffixes = ["A", "B", "C"]
            index = 0
            for sample, answer in samples.items():
                fields["Sample" + sample_suffixes[index]] = sample
                fields["Answer" + sample_suffixes[index]] = answer
                index += 1

        if word.has_image_card():
            fields["HasImageCard"] = str(word.has_image_card())
        if word.has_definition_card():
            fields["HasDefinitionsCard"] = str(word.has_definition_card())
        if word.has_translation_card():
            fields["HasTranslationCard"] = str(word.has_translation_card())

        # Get the deck
        deck = col.decks.byName("English")

        # Instantiate the new note
        note = col.newNote()
        note.model()['did'] = deck['id']

        # Ordered fields as defined in Anki note type
        anki_fields = [
            "Word",
            "Sound",
            "DefinitionsWithSamples",
            "DefinitionsOnly",
            "Image",
            "IPA",
            "Translation",
            "Synonyms",
            "SampleA",
            "SampleB",
            "SampleC",
            "HasImageCard",
            "HasDefinitionsCard",
            "AnswerA",
            "AnswerB",
            "AnswerC",
            "HasTranslationCard"
        ]

        for field, value in fields.items():
            note.fields[anki_fields.index(field)] = value

        # Set the tags (and add the new ones to the deck configuration
        tags = "word"
        note.tags = col.tags.canonify(col.tags.split(tags))
        m = note.model()
        m['tags'] = note.tags
        col.models.save(m)

        # Add the note
        col.addNote(note)


if __name__ == '__main__':

    # We provide a command-line interface with various options
    import argparse, glob

    parser = argparse.ArgumentParser()
    parser.add_argument("anki_home",
        help="Home of your Anki installation")
    parser.add_argument("-f", "--folder",
        help="Input folder where to search files", default="../save")
    parser.add_argument("--rank",
        help="Rank of the word to load", type=int)
    parser.add_argument("--from",
        help="Rank of the first word to load", type=int,
        default=0, dest="start")  # reserved word
    parser.add_argument("--to",
        help="Rank of the last word to load", type=int, default=100000,
        dest="end")  # to be consistent with start
    args = parser.parse_args()

    print("----------------------------------")
    print("Word Loader ----------------------")
    print("----------------------------------")
    print("Anki home: %s\n" % args.anki_home)

    # Load the anki collection
    cpath = os.path.join(args.anki_home, "collection.anki2")
    col = Collection(cpath, log=True)

    # Set the model
    modelBasic = col.models.byName('Word')
    deck = col.decks.byName("English")
    col.decks.select(deck['id'])
    col.decks.current()['mid'] = modelBasic['id']

    if args.rank:

        # Only one word to load
        print("Only rank %d to load" % args.rank)
        glob_pattern = "%d-*.json" % args.rank
        file_pattern = os.path.join(args.folder, glob_pattern)
        print("File pattern: " + file_pattern)
        for filepath in glob.iglob(file_pattern):
            load(col, filepath)

    else:

        # Iterate over input folder
        glob_pattern = '[1-9]*-*.json'

        file_pattern = os.path.join(args.folder, glob_pattern)
        for filepath in glob.iglob(file_pattern):
            filename = os.path.basename(filepath)
            rank = int(filename[:filename.index('-')])
            if rank >= args.start and rank < args.end:
                load(col, filepath)
            else:
                print("Skipped %s" % filename)


    # Save the changes to DB
    col.save()
To launch the program, first close our Anki application if running and enter the following command:
$ pwd
~/workspace/anki-scripting/anki-vocabulary-assistant
python scripts/load_word.py \
  --folder save/
  --from 1
  --to 1000
  ~/Documents/Anki/User\ 1/
Relaunch Anki. You should see new cards under the English deck.
Congratulations! We finally comes to the end of this lengthy post. We have seen how the internal API of Anki could be used in various scenarios. This is not complete, however. It remains the most important task — study all of these newly created flashcards!
|
To remember
|

About the author
Julien Sobczak works as a software developer for Scaleway, a French cloud provider. He is a passionate reader who likes to see the world differently to measure the extent of his ignorance. His main areas of interest are productivity (doing less and better), human potential, and everything that contributes in being a better person (including a better dad and a better developer).
Read Full Profile