|
You are reading a translation of an old blog post published on my previous blog in French. |
No more boring slides with Reveal.js. How does this library based on HTML5 and CSS3 technologies challenge the existence of PowerPoint? We will find out by rewriting from scratch a minimal version.
| Reveal.js is published under an OpenSource license. The code presented in this article has been simplified for obvious reasons and must not be used outside this learning context. This article is based on the latest version at the moment of publication. |
A First Example
<!doctype html>
<html lang="en">

    <head>
        <meta charset="utf-8">

        <title>Implementing reveal.js from scratch</title>

        <link rel="stylesheet" href="css/reveal.css">
        <link rel="stylesheet" href="css/theme/black.css">
    </head>

    <body>

        <div class="reveal slide"> <!-- fade/slide/concave -->

            <!-- Any section element inside of this container is displayed as a slide -->
            <div class="slides">
                <section>
                    <h1>Reveal.js</h1>
                    <h3>Implement the HTML Presentation Framework from Scratch</h3>
                    <p>
                        <small>
                            Reveal.is was created by
                            <a href="http://hakim.se">Hakim El Hattab</a>
                        </small>
                    </p>
                    <p>
                        <!-- Exemple of internal link -->
                        We will support link between slides, <a href="#/2">like this</a>.
                    </p>
                </section>

                <!-- Example of nested vertical slides -->
                <section>
                    <section>
                        <h2>Vertical Slides are supported too !</h2>
                        <p>You could use <em>arrows</em> to navigate through all slides.</p>
                    </section>
                    <section>
                        <h2>You could adjust the window size</h2>
                        <p>Slides are automatically resized.</p>
                    </section>
                </section>

                <section>
                    <h2>Finished!</h2>
                    <p>
                        <small>
                            <a href="https://www.juliensobczak.com">Read the post</a>
                        </small>
                    </p>
                </section>
            </div>

        </div>

        <script src="/js/reveal.js"></script>

        <script>

            Reveal.initialize();

        </script>

    </body>
</html>
Here is the rendered result of our presentation:
Reveal.js is far more powerful than what this simple presentation suggests. The lists of features supported by Reveal is huge: a ton of animations, overview, fragments, mode speaker, PDF export, … We are not going to implement all of these features but instead focus on the navigation between slides (horizontal et vertical), the links, the keyboard shortcuts, and also a few animations that make reveal.js so attractive.
Slide by slide
The initialization of Reveal starts with the method Reveal.initialize(). Here is the skeleton of our implementation defined in a file reveal.lite.js:
var Reveal;

(function() {

    'use strict';

    var SLIDES_SELECTOR = '.slides section', (1)
        HORIZONTAL_SLIDES_SELECTOR = '.slides>section',
        VERTICAL_SLIDES_SELECTOR = '.slides>section.present>section',

        // The horizontal and vertical index of the currently active slide
        indexh, (2)
        indexv, (2)

        // Cached references to DOM elements
        dom = {};

    function initialize() {

        // Cache references to elements
        dom.wrapper = document.querySelector( '.reveal' );
        dom.slides = document.querySelector( '.reveal .slides' );

        // Go to first slide
        slide(0, 0); (3)
    }


    /**
     * Steps from the current point in the presentation to the
     * slide which matches the specified horizontal and vertical
     * indices.
     *
     * @param {int} h Horizontal index of the target slide
     * @param {int} v Vertical index of the target slide
     */
    function slide( h, v ) {

    }


    Reveal = {
        initialize: initialize
    };

})();| 1 | We predefine main CSS selectors to retrieve all slides or just the horizontal and vertical ones. These constants will be reused several times during the next steps. |
| 2 | We define two variables indexh and indexv to represent our current position inside the presentation, like a slide number. |
| 3 | We end by requesting the display of the first slide (i.e., the first horizontal and vertical slide). For the moment, everything remains to be implemented in this method. |
Before going further, we need to define a basic CSS stylesheet; otherwise, the browser will display all slides at once.
html, body {
  width: 100%;
  height: 100%;
  overflow: hidden; }

.reveal {
  position: relative;
  width: 100%;
  height: 100%; }

.reveal .slides {
  position: absolute;
  top: 0;
  right: 0;
  bottom: 0;
  left: 0;
  text-align: center; }

.reveal section {
  position: absolute;
  width: 100%; }
The page now looks like this:
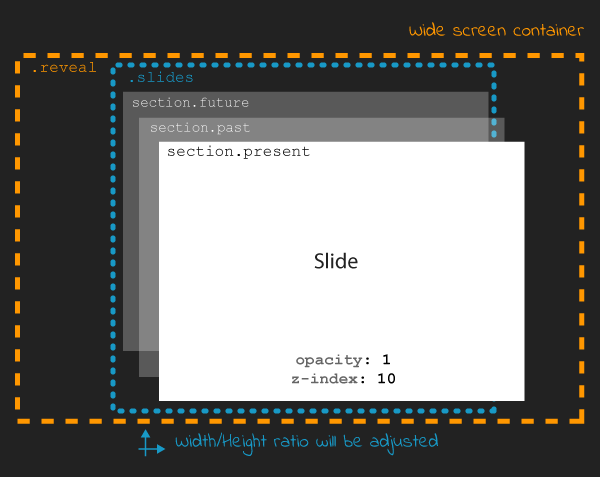
The parent tag with the CSS class .reveal (called wrapper in the code) is positioned to use all available space on the screen. This allows slides inside this wrapper to occupy the screen. Note that the relative position will be useful to position slides using absolute values when defining CSS animations.
All slides are thus superimposed on top of each other. The JavaScript code will use a few CSS classes (past, present, future) to change the slides on screen. For example, to display the current slide:
.reveal section.present {
  opacity: 1;
  z-index: 10 }

.reveal section.past, .reveal section.future {
  opacity: 0; }
The transition from one slide to a different one is done by the method slide:
function slide( h, v ) {

    // Activate and transition to the new slide
    indexh = updateSlides( HORIZONTAL_SLIDES_SELECTOR, h === undefined ? indexh : h );
    indexv = updateSlides( VERTICAL_SLIDES_SELECTOR, v === undefined ? indexv : v );

    layout();

}
The code operates two translations, on the horizontal and vertical axis. The core logic resides in the method updateSlides:
/**
 * Updates one dimension of slides by showing the slide
 * with the specified index.
 *
 * @param {String} selector A CSS selector that will fetch
 * the group of slides we are working with
 * @param {Number} index The index of the slide that should be
 * shown
 *
 * @return {Number} The index of the slide that is now shown,
 * might differ from the passed in index if it was out of
 * bounds.
 */
function updateSlides( selector, index ) {

    // Select all slides and convert the NodeList result to
    // an array
    var slides = [].slice.call( dom.wrapper.querySelectorAll( selector ) ),
        slidesLength = slides.length;

    if( slidesLength ) {

        for( var i = 0; i < slidesLength; i++ ) {
            var element = slides[i];

            element.classList.remove( 'past' );
            element.classList.remove( 'present' );
            element.classList.remove( 'future' );

            // If this element contains vertical slides
            if( element.querySelector( 'section' ) ) {
                element.classList.add( 'stack' );
            }

            if( i < index ) {
                // Any element previous to index is given the 'past' class
                element.classList.add( 'past' );
            }
            else if( i > index ) {
                // Any element subsequent to index is given the 'future' class
                element.classList.add( 'future' );
            }
        }

        // Mark the current slide as present
        slides[index].classList.add( 'present' );
    }
    else {
        // Since there are no slides we can't be anywhere beyond the
        // zeroth index
        index = 0;
    }

    return index;

}
This is the first method with a lot of implementation details. The code logic is relatively simple. The first parameter is a CSS selector. In practice, this parameter is mainly used to indicate if we are sliding horizontally or vertically. The second parameter is the index on the chosen axis. The code traverses each slide on this axis to configure the right CSS classes. Note the presence of a class stack assigned on slides of type parent (i.e., the slides having vertical slides inside).
The value returned by this method updateSlides is the new index used to adjust the previous variables indexh and indexv in the method slide.
|
Zoom on
element.classListSupported by modern browsers, the property |
Automatic Resizing
You have probably noticed on the Reveal.js demo, the size of the presentation (i.e., the slides) automatically adjusts when you resize your browser window. With our current implementation, the slides occupy the full screen, but their content does not scale in consequence:
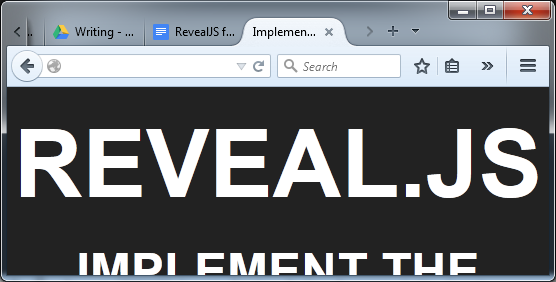
How can the content of the slides be adapted to the screen size? How to reduce/enlarge the font size, images, and videos shown? The solution is elegant, using CSS animations like the function scale(). The calculations are grouped inside the method layout:
/**
 * Applies JavaScript-controlled layout rules to the presentation.
 */
function layout() {

    var size = {
        slideWidth: 960,
        slideHeight: 700,
        presentationWidth: dom.wrapper.offsetWidth,
        presentationHeight: dom.wrapper.offsetHeight
    };

    var slidePadding = 20;

    dom.slides.style.width = size.slideWidth + 'px';
    dom.slides.style.height = size.slideHeight + 'px';

    // Determine scale of content to fit within available space
    var scale = Math.min(
      size.presentationWidth / size.slideWidth,
      size.presentationHeight / size.slideHeight );

    dom.slides.style.left = '50%'; (1)
    dom.slides.style.top = '50%';
    dom.slides.style.bottom = 'auto';
    dom.slides.style.right = 'auto';
    dom.slides.style.transform = 'translate(-50%, -50%) scale(' + scale + ')';

}| 1 | We compare the default size for a slide (960x700) with the effective screen size. We obtain the ratio to apply to scale the slide to match the full screen. |
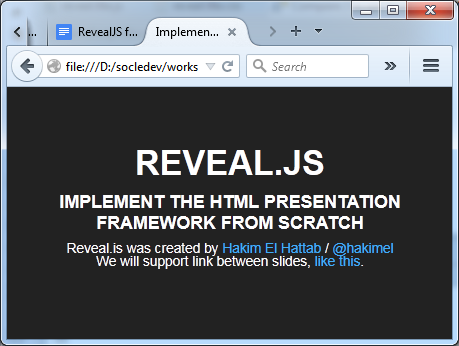
Let’s modify the method slide to use this new method:
  1
2
3
4
5
6
7
8

  function slide( h, v ) {

    // Activate and transition to the new slide
    indexh = updateSlides( HORIZONTAL_SLIDES_SELECTOR, h === undefined ? indexh : h );
    indexv = updateSlides( VERTICAL_SLIDES_SELECTOR, v === undefined ? indexv : v );

    layout();
}
The result is immediately more satisfactory. The slides resize to match the window size, except if you are trying to resize the browser window. This is easy to fix by reusing the method layout and listening for this event:
  1
2
3
4
5
6
7
8
9
10
11
12
13
14
15
16

  function initialize() {

    // Cache references to elements
    dom.wrapper = document.querySelector( '.reveal' );
    dom.slides = document.querySelector( '.reveal .slides' );

    // Subscribe to events
    window.addEventListener( 'resize', onWindowResize, false );

    // Read the initial hash
    slide(0, 0);
}

function onWindowResize( event ) {
    layout();
}
Keyboard Navigation
For now, only the first slide is displayed. Using the directional keys, we will allow the user to change the current slide. We start by listening for events of type keydown. We also take the opportunity to refactor the method initialize:
  1
2
3
4
5
6
7
8
9
10
11
12
13
14
15
16
17
18
19
20
21
22
23
24
25
26
27
28
29
30
31
32
33
34
35
36

  /**
 * Starts up the presentation.
 */
function initialize() {

    // Make sure we've got all the DOM elements we need
    setupDOM();

    // Subscribe to input
    addEventListeners();

    // Go directly to the first slide
    slide(0, 0);
}

/**
 * Finds and stores references to DOM elements which are
 * required by the presentation.
 */
function setupDOM() {

    // Cache references to elements
    dom.wrapper = document.querySelector( '.reveal' );
    dom.slides = document.querySelector( '.reveal .slides' );

}

/**
 * Binds all event listeners.
 */
function addEventListeners() {

    window.addEventListener( 'resize', onWindowResize, false );
    document.addEventListener( 'keydown', onDocumentKeyDown, false );

}
The handler uses standard codes to determine the direction to follow in the presentation:
/**
 * Handler for the document level 'keydown' event.
 */
function onDocumentKeyDown( event ) {

    switch( event.keyCode ) {
        // left
        case 37: navigateLeft(); break;
        // right
        case 39: navigateRight(); break;
        // up
        case 38: navigateUp(); break;
        // down
        case 40: navigateDown(); break;
    }

}

function navigateLeft()  { slide( indexh - 1 );         } (1)
function navigateRight() { slide( indexh + 1 );         } (1)
function navigateUp()    { slide( indexh, indexv - 1 ); } (1)
function navigateDown() { slide( indexh, indexv + 1 ); } (1)| 1 | We use the two variables indexh and indexv to determine our current position, before calling the method slide to move in the right direction. |
The navigation is now operational but the code does not block the user from moving beyond the last slide. Using CSS selectors, we will determine the maximum number of slides and compare with our current position to determine if the move is possible:
  1
2
3
4
5
6
7
8
9
10
11
12
13
14
15
16
17
18
19
20
21
22
23
24
25
26
27
28
29
30
31
32
33
34
35
36
37
38
39
40
41
42
43
44
45
46
47
48
49
50
51
52

  /**
 * Determine what available routes there are for navigation.
 *
 * @return {Object} containing four booleans: left/right/up/down
 */
function availableRoutes() {

    var horizontalSlides = dom.wrapper.querySelectorAll( HORIZONTAL_SLIDES_SELECTOR ),
        verticalSlides = dom.wrapper.querySelectorAll( VERTICAL_SLIDES_SELECTOR );

    var routes = {
        left: indexh > 0,
        right: indexh < horizontalSlides.length - 1,
        up: indexv > 0,
        down: indexv < verticalSlides.length - 1
    };

    return routes;

}

function navigateLeft() {

    if( availableRoutes().left ) {
        slide( indexh - 1 );
    }

}

function navigateRight() {

    if( availableRoutes().right ) {
        slide( indexh + 1 );
    }

}

function navigateUp() {

    if( availableRoutes().up ) {
        slide( indexh, indexv - 1 );
    }

}

function navigateDown() {

    if( availableRoutes().down ) {
        slide( indexh, indexv + 1 );
    }

}
Animations
Reveal.js would not be the same without animations. Under the hood, those animations use CSS animations. Using the already defined CSS classes, only a few lines of CSS is necessary to animate the slides.
Let’s start with the most simple effect: fade.
The fade effect
(Demo)
As a reminder, here are the CSS declarations that will be enriched:
.reveal section.present {
  opacity: 1; }

.reveal section.past, .reveal section.future {
  opacity: 0; }
The fade effect consists in defining a transition for the property opacity:
.reveal.fade section {
  transition: opacity 0.5s; }
Every time the user changes the current slide, the previous one disappears in half a second while the new slide appears simultaneously. Easy? Let’s try to implement the slide effect.
The slide effect
(Demo)
When using this effect, the previous slide disappears on the left while the next one appears on the right of the screen. For vertical slides, the principle is the same, except we are using the vertical axis.
Here are the CSS declarations to support this effect:
.reveal.slide section {
  transition: all 800ms ease-in-out; } (1)

.reveal.slide .slides > section.past {
  transform: translate(-150%, 0); } (2)

.reveal.slide .slides > section.future {
  transform: translate(150%, 0); } (2)

.reveal.slide .slides > section > section.past {
  transform: translate(0, -150%); } (2)

.reveal .slides > section > section.future {
transform: translate(0, 150%); } (2)| 1 | We configure the animation to start slowly. |
| 2 | We rely on the function translate. Using a large percent, we are sure the slide will completely exit the screen. |
An immersion in 3D to finish? Let’s finish with the concave effect.
The concave effect
(Demo)
This effect is the 3D equivalent of the previous slide.
The CSS declarations is slightly more advanced but only a few lines are required to support this effect:
.reveal .slides {
  /* ... */
  text-align: center;
  perspective: 600px;
  perspective-origin: 50% 40%; }

.reveal.concave section {
  transform-style: preserve-3d;
  transition: all 800ms cubic-bezier(0.26, 0.86, 0.44, 0.985); }

.reveal.concave .slides > section.past {
  transform: translate3d(-100%, 0, 0) rotateY(90deg) }

.reveal.concave .slides > section.future {
  transform: translate3d(100%, 0, 0) rotateY(-90deg) }

.reveal.concave .slides > section > section.past {
  transform: translate3d(0, -80%, 0) rotateX(-70deg) }

.reveal.concave .slides > section > section.future {
transform: translate3d(0, 80%, 0) rotateX(70deg) }|
Zoom on function
cubier-bezierThe CSS property The website cubic-bezier.com allows you to create visually your curve and generates the corresponding CSS code. This site is the work of Lea Verou, to whom we also owe the projects -prefix-free and prism. |
Links
Before closing this article, let’s look at the links between slides.
The solution relies on the URL fragment (the optional hash value following the character in an URL) to identify the slide to display. For example /1/2 represents the second vertical slide below the first horizontal slide. When clicking on a link, the code modifies the hash like this:
<p>
  <!-- Example of internal link -->
  We will support link between slides, <a href="#/2">like this</a>.
</p>
In JavaScript, we need to listen for changes using the event hashchange, and extract the value to delegates to the method slide to move to the destination:
  1
2
3
4
5
6
7
8
9
10
11
12
13
14
15
16
17
18
19
20
21
22
23
24
25
26
27
28
29
30
31

  /**
 * Binds all event listeners.
 */
function addEventListeners() {

    window.addEventListener( 'hashchange', onWindowHashChange, false );
    window.addEventListener( 'resize', onWindowResize, false );
    document.addEventListener( 'keydown', onDocumentKeyDown, false );

}

function onWindowHashChange( event ) { readURL(); }

/**
 * Reads the current URL (hash) and navigates accordingly.
 */
function readURL() {

    var hash = window.location.hash;

    var bits = hash.slice( 2 ).split( '/' );

    // Read the index components of the hash
    var h = parseInt( bits[0], 10 ) || 0,
        v = parseInt( bits[1], 10 ) || 0;

    if( h !== indexh || v !== indexv ) {
        slide( h, v );
    }

}
Using the hash has many advantages. It also allows the user to bookmark a given slide. This requires a slight modification to read the hash during initialization:
/**
 * Starts up the presentation.
 */
function initialize() {

    // Make sure we've got all the DOM elements we need
    setupDOM();

    // Subscribe to input
    addEventListeners();

    // Read the initial hash
    readURL(); (1)

}| 1 | The method slide is wrapped inside a new method readURL. If no hash is present, we simply display the first slide as before. |
|
Congratulations!
Congratulations, you have written a minimal and operational version of Reveal.js in less than 200 lines of JavaScript code, with just 100 lines of CSS code. The example presentation is available here, just like the complete source code. |
To Go Further
AMD Support & Node
Reveal.js, like many existing libraries, started by exposing a single global variable (Reveal). With the introduction of AMD modules and following the success of Node.js, Reveal needs to support these new use cases. The solution is not new and has been well documented through the UMD Pattern (Universal Module Definition).
The UMD pattern makes possible to interoperate with existing loaders. As often in JavaScript, we inspect the objects present in the global namespace to detect the environment. Here is a preview of the code:
(function( root, factory ) { (1)
    if( typeof define === 'function' && define.amd ) {
        // AMD. Register as an anonymous module.
        define( function() { (2)
            root.Reveal = factory();
            return root.Reveal;
        } );
    } else if( typeof exports === 'object' ) {
        // Node.
        module.exports = factory(); (3)
    } else {
        // Browser globals.
        root.Reveal = factory(); (4)
    }
}( this, function() {

    var Reveal;
    // ... (All code presented in this post)

    return Reveal;

}));| 1 | Functions are the only possible scope in JavaScript. This is why we use an immediate function to not pollute the global namespace uselessly. |
| 2 | We test for a method define having a property amd to determine if RequireJS is available. Reveal.js declares itself as an anonymous module without any dependency. |
| 3 | Like for AMD, we test for an object exports. Reveals declares itself like any other Node module. |
| 4 | As before, our module is defined as a global variable, or more precisely a property of the object window. |
|
To Remember
|
|
Try for yourself!
Reveal.js is a complete solution. Just look at the speaker mode to convince you. We have omit a lot of features in this article. Why not adventure in the original source code to discover how these advanced features are implemented. For example:
|

About the author
Julien Sobczak works as a software developer for Scaleway, a French cloud provider. He is a passionate reader who likes to see the world differently to measure the extent of his ignorance. His main areas of interest are productivity (doing less and better), human potential, and everything that contributes in being a better person (including a better dad and a better developer).
Read Full Profile