Anki Scripting for Non-Programmers
|
This post revises an old post that I wrote four years ago, Anki Scripting. My motivation at that time was just to publish my notes mainly for myself. I have not anticipated that so many learners were trying to automate their flashchards creation. I finished memorizing the thousands of flashcards I created programmatically. I need to create new ones, and I thought revising my old post could be useful. |
This post is written for an audience with minimal programming skills. I’ve tried to keep it small, and provide basic solutions to automate your flashcards easily.
|
My Environnement
The code present in this article was tested on MacOS using Python 3.8 and Anki 2.1.35. Future versions must be working but if you encounter errors, differences with your environment may explain why I didn’t get the same error. |
Under the Hood
Anki is packaged as a Desktop application for Windows/MacOS/Linux. Additional applications exist for Android and iOS but the core of Anki resides in the desktop version.
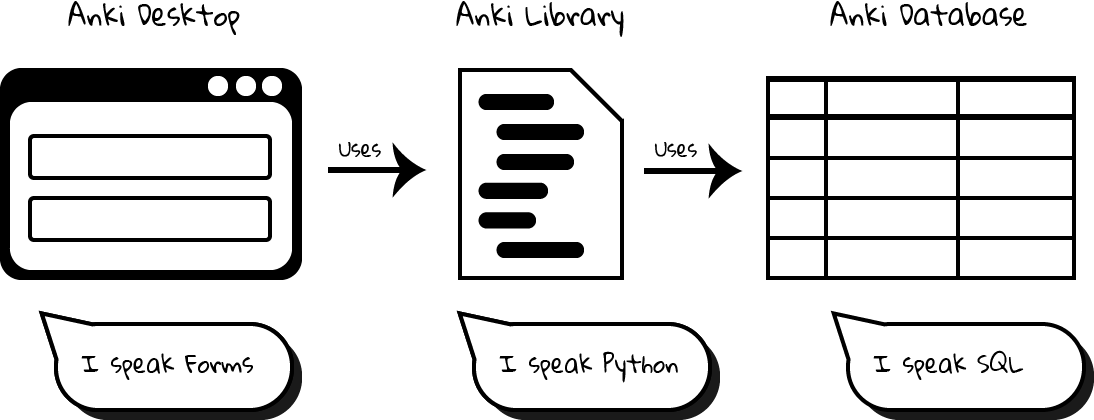
The Anki source code is available on GitHub, the largest code hosting platform used by millions of developers to share their work. The majority of code you use in your daily life, on your computer, tablet, or phone, has home in GitHub.
|
Python, the programming language
Anki is written in Python (at least at the time of writing), which is great because Python is the main programming language to initiate new coders. Python syntax is intuitive and excels for small programs like we are going to write in this article. If you are curious about programming, starting with Python is a great choice. Learning Python is not just useful for interacting with Anki. Learning Python is a fun way to get starting with programming. |
To automate the creation of our flashcards, several strategies are possible:
-
Insert new cards directly inside the SQL database (think of a SQL database like a spreadsheet file with many tabs, columns, and lines). This approach requires a perfect comprehension of the schema. Each column need to be specified or Anki will complain at startup when trying the read our changes.
-
Create new cards using the Anki Python API (think of an API as a list of capabilities that we can ask Anki to perform). This approach requires to write Python code (the API speaks only in Python, so you have to speak in Python if you want to be understood). Contrary to the first approach, the API contains the logic to initialize most columns automatically. We can focus exclusively on the content of our flashcards.
-
Use a bot to simulate inputs and clicks using the Anki GUI. My experience with such tools is not so great. Future changes in the UI can easily break everything and you will have to repeat the process from scratch. Like the previous approach, code is required using this strategy too, and will be even more challenging than using the Anki API.
Consequently, like for my previous post, I think the best approach is to use the Python API to create our flashcards. Interacting with the SQL database or the GUI is brittle as every new version of Anki may change the schema or the UI. The Python API is the more stable component. This explains why I think it’s preferable to rely on it.
Using the Anki Python Library
|
Not feeling the programmer in you?
If you don’t want to get your hands dirty in code, you can safely jump to the next section where I will explain how to load flashcards into Anki without writing a single line of code. |
When using the Desktop application, the Graphical User Interface (GUI) validates your inputs and uses the Anki API (a Python module) to create your cards, which hides the details about the underlying database. In this tutorial, we are going to create a script that, like the Desktop application, will interact with the Anki Python API.
But first, we need to create a safe environment. Writing code means writing bugs. And bugs can make irreversible damages. You don’t want to lose your Anki collection, so let’s create a sandbox environnement. The trick is to start Anki from your terminal and pass the option -b to specify a custom directory:
-
On Windows:
"C:\Program Files\Anki\anki.exe" -b "%PWD%/AnkiTest" -
On MacOS:
open /Applications/Anki.app --args -b $PWD/AnkiTest -
On Linux:
anki -b $PWD/AnkiTest
Great. The directory ~/AnkiTest/ is now a valid Anki directory.
The next step is to install the Python package aqt (which installs automatically the core package anki):
$ pip3 install aqt|
Command not found
If the previous command ends with the error |
We now create a file demo.py in the current directory containing the following script. This script creates a single flashcard.
import os
from anki.storage import Collection (1)
# Find the Anki directory (2)
anki_home = '/Users/julien/AnkiTest/User 1'
anki_collection_path = os.path.join(anki_home, "collection.anki2")
# 1. Load the anki collection (3)
col = Collection(anki_collection_path, log=True)
# 2. Select the deck (4)
# Find the model to use (Basic, Basic with reversed, ...)
modelBasic = col.models.byName('Basic')
# Set the deck
deck = col.decks.byName('Default')
col.decks.select(deck['id'])
col.decks.current()['mid'] = modelBasic['id']
# 3. Create a new card (5)
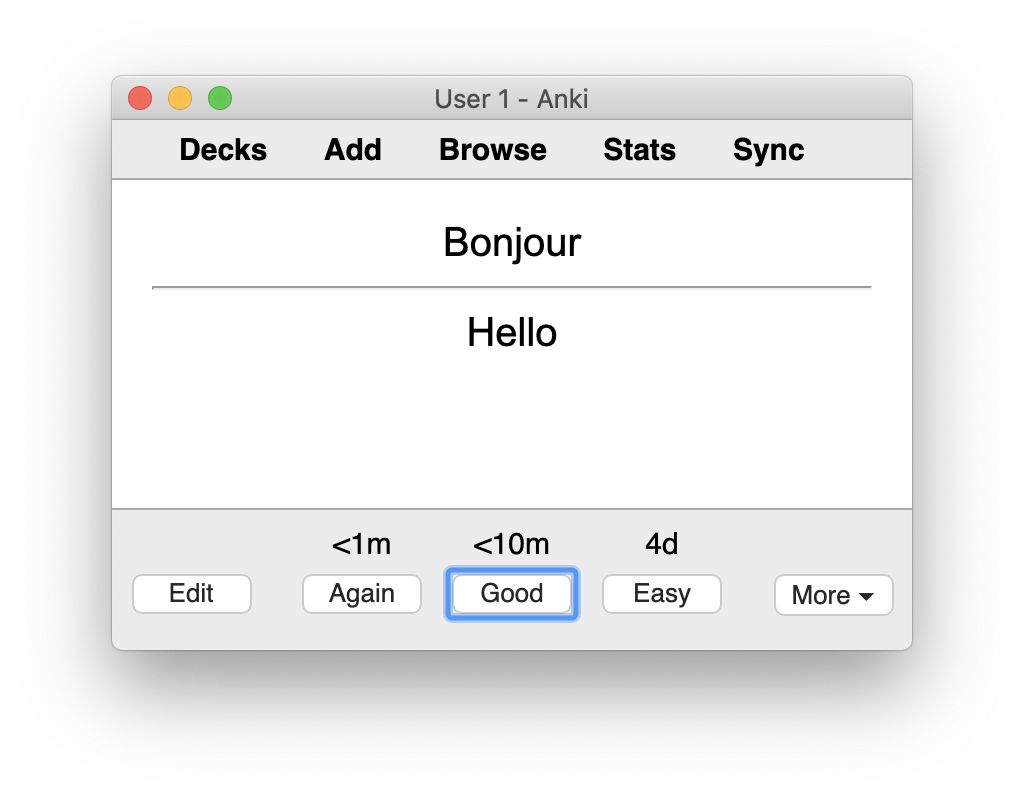
note = col.newNote()
note.fields[0] = "Bonjour" # The Front input field in the UI
note.fields[1] = "Hello" # The Back input field in the UI
col.add_note(note, deck['id'])
# 4. Save changes (6)
col.save()| 1 | This code references the Python module that we installed with the previous command pip3. |
| 2 | This code determines the Anki directory to use. For this test, we use the path to our sandbox environnement. Make sure the path you specify really exists and use an absolute path (not a path like ./AnkiTest). |
| 3 | This code is equivalent to opening the Anki application. |
| 4 | This code is equivalent to clicking on a deck on the main screen. This way, when we will create new flashcards, they will belong to this deck. |
| 5 | This code has the same effect as clicking on the button "Add" and fill in the form. |
| 6 | This code has the same effect as exiting the Anki application. |
Then, run the script:
$ python3 demo.pyOur Anki collection has been updated. You can reopen Anki from the terminal as before to select your sandbox environment. A new flashcard will be present!
|
Help! Anki Desktop failed at startup.
The Python script uses the Anki Python module installed using the command If your version of Anki Desktop is outdated, Anki may complain. Indeed, this version may not understand the changes done by a later Anki version. This problem is well known among developers and is called forward compatibility. In practice, most programs support backward compatibility (Anki knows how to load a collection created by an older version) but few support forward compatibility (Anki ignores how to load a collection created by a future version). 
If Anki complain at startup, try to update Anki Desktop to the latest available version so you can read any collection created by any version of Anki. |
Great! We created a single flashcard. Using basic Python syntax, it is possible to extend the script to create a lot of flashcards. Here is a different version using a global array containing the flashcards to create:
# batch.py
import os

from anki.storage import Collection

notes = [ (1)
  {
    "Front": "Bonjour",
    "Back": "Hello",
  },
  {
    "Front": "Merci",
    "Back": "Thank you",
  },
  # Thousands of additional notes...
]

# Find the Anki directory
anki_home = '/Users/julien/AnkiTest/User 1'
anki_collection_path = os.path.join(anki_home, "collection.anki2")

# 1. Load the anki collection
col = Collection(anki_collection_path, log=True)

# 2. Select the deck
modelBasic = col.models.byName('Basic')
deck = col.decks.byName('Default')
col.decks.select(deck['id'])
col.decks.current()['mid'] = modelBasic['id']

# 3. Create the cards
for current_note in notes: (2)
  note = col.newNote()
  note.fields[0] = current_note["Front"]
  note.fields[1] = current_note["Back"]
  col.add_note(note, deck['id'])

# 4. Save changes
col.save()| 1 | Create a variable containing all the notes to create. |
| 2 | Iterate over this variable and create the notes as before. |
Run the script:
$ python3 batch.pyReopen Anki. You now have more cards to review!
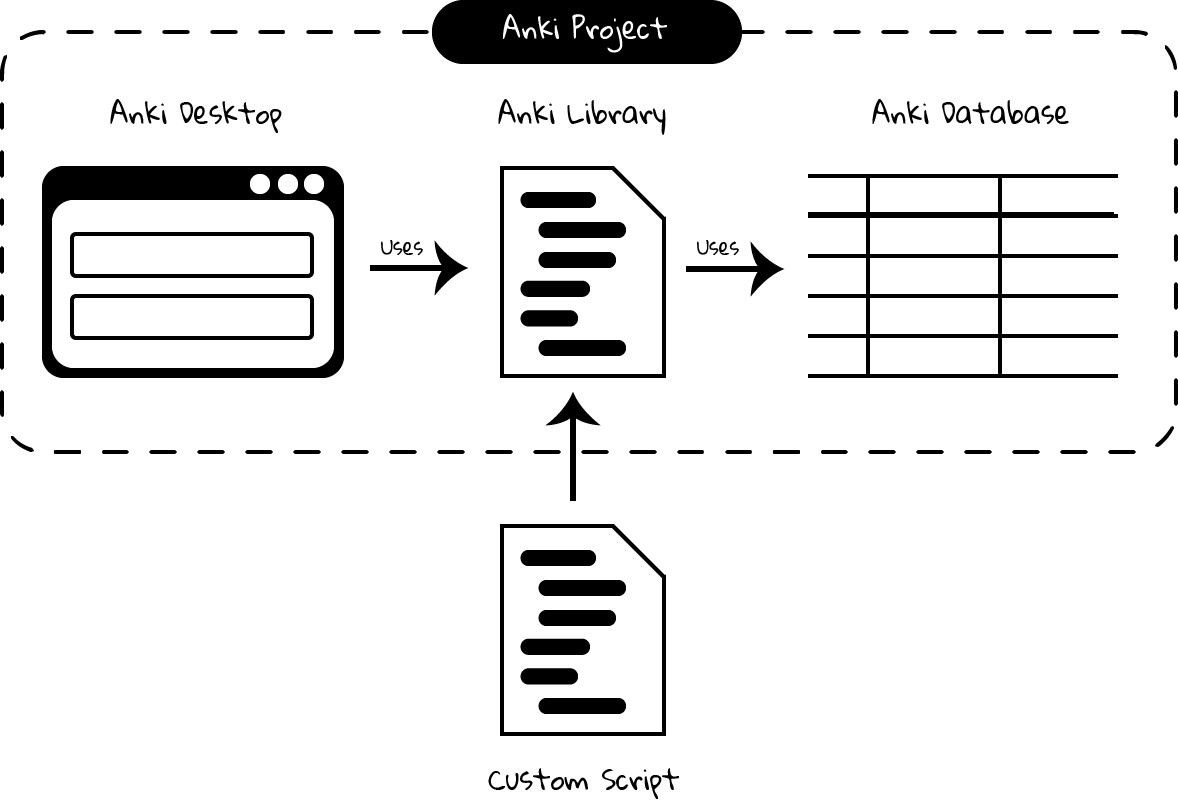
That’s all for the programming stuff. The next section applies the same logic and presents a small utility I created so that you don’t need to write Python code.
Hiding the Anki Python Library behind a CLI
The Anki library code is published as a Python package, a way for developers to share and reuse code. When we run the command pip3 install in the previous section, we use the de facto standard tool in Python to install a package locally. This means we can now create a Python program reusing the Anki code as we did in the previous section.
To avoid writing the same code every time, I published another package that I named anki-cli-unofficial. A package can use other packages, which is called dependencies in programming jargon and is probably the biggest challenge for any developers. My package depends logically on the package anki and instead of storing the content of the flashcards directly in the code, the script asks for an input file. Let’s try it!
| AnkiConnect is another project you may find interesting. AnkiConnect is an community add-on that exposes the internal Python API through a simple HTTP API. The motivation is similar by allowing users to script their flashcard creation. This approach is probably less fragile compared to what I will explain in this section, even if using the Python API directly can be more powerful in some cases. |
To install the pip package:
$ pip install anki-cli-unofficial|
Dependency Hell
When installing this package, you will also install its dependencies like |
After installation, a new command anki-cli-unofficial is available from your terminal. You don’t need to launch python3 as we did until now. We called such a program a command-line interface (CLI).
$ anki-cli-unofficial load -h

usage: anki-cli-unofficial load [-h]
                                [--anki-dir ANKI_DIR]
                                [--media-dir MEDIA_DIR]
                                [--deck DECK]
                                input_file
                                output_file

positional arguments:
  input_file            file containing the flashcards to create
  output_file           Anki generated archive filepath

optional arguments:
  -h, --help            show this help message and exit
  --anki-dir ANKI_DIR   Anki user directory (Default to a temp directory)
  --media-dir MEDIA_DIR local directory containing the medias referenced in
                        input_file
  --deck DECK           deck name in which to create flashcards
The CLI supports a single command load. This command accepts various arguments but for this article, we can focus only on the two required ones:
-
input_file: A YAML file containing the content of your flashcards to create. (This file must exist.) -
output_file: The filename that the CLI will use to create the Anki archive. (This file doesn’t have to exist and be will overriden otherwise.)
Editing the input file
Here is an example of a valid input file containing French words and expressions (the file is named french.yml):
# An example using only text
- type: Basic
  tags: [idiom]
  fields:
    Front: 'Avoir la banane! <small>idiom</small>'
    Back: 'To feel great. (literally: <em>to have the banana<em>)'

# An example playing a sound when the back card is displayed
- type: Basic
  tags: [word]
  fields:
    Front: 'Bonjour <small>interj.</small>'
    Back: >
      [sound:bonjour.mp3]
      Hello <small>interj.</small>

# An example using a picture
- type: Basic
  tags: [word]
  fields:
    Front: '<img src="car.jpg" />'
    Back: Voiture <small>n.</small>
The note fields can reference medias using the usual Anki syntax (<img src="…"/> for images and [sound:…] for sounds). The CLI will try to load these files into the Anki medias database.
|
The file is a YAML file. YAML is popular among developers and can be considered like a supercharged CSV or TXT file. Check the Wikipedia page if you have never used this format before. The syntax is easy to grasp if you have a good text editor, which will ensure only spaces are used and not tabulations.
The CLI expects the YAML file to respect a given format:
- type: Basic        # Required (the name of the note type as displayed in Anki)
  tags: [tag1, tag2] # Optional (a list of tags to add to this note)
  fields:            # Required (the ORDERED fields as listed in Anki Desktop)
    Field1: "The content of the field named Field1. <i>HTML is supported</i>."
    Field2: >
      The content of the field named Field2.
      YAML has several syntaxes to include a large text value.
      Check this website https://yaml-multiline.info/ for more information.
There are several strategies to create your input file:
-
Manually. Open your favorite text editor, and start writing, copying/pasting text from the Internet, and editing the content.
-
Programmatically. Open your favorite code editor, and write a small program to generate the YAML file. You can use any language, not just Python, even if personally, I love using Python for such scripts.
Running the CLI
Let’s load the file french.yml:
$ anki-cli-unofficial load french.yml french.apkgWhen running this command, the CLI creates a new temporary Anki directory. It does not work directly on your Anki collection. There are limitations with such an approach. For example, you are limited to the default Anki note types (Basic, Basic (with reversed card), Basic (optional reversed card), Cloze). The main advantage is the command is safe. It will not trash your flashcards due to a bug.
|
Bypassing the sandbox environment
The option |
The command outputs useful informations:
$ anki-cli-unofficial load french.yaml french.apkg

📂 Opening Anki collection...
🔍 Loading 'french.yaml' into the deck 'Default'...
        - copying media file 'bonjour.mp3'
        - copying media file 'car.jpg'
💾 Saving Anki collection...
👍 Done
👉 Anki collection can be opened using the following command:
        open /Applications/Anki.app --args -b /var/folders/tmpn8rl4l2w (1)
👉 Anki Archive is available here: ./french.apkg (2)| 1 | The CLI displays a valid command to run locally if you want to inspect the sandbox directory using the Anki Desktop application. This is a good way to validate that your flashcards have correctly been generated. |
| 2 | The CLI displays the location of the Anki archive file containing your flashcards. This is the file to import in your collection when running Anki without option. |
We also notice based on the command output that the CLI tries to load the media files referenced in our input file. By default, the CLI expects the file to be present in the current directory. You can specifiy a different directory using the option --media-dir:
$ ls path/to/medias
bonjour.mp3   car.jpg

$ anki-cli-unofficial load --media-dir path/to/medias/ french.yaml french.apkg
The generation process is summarized in the following video:
Importing the output file
The CLI generates a new file in the current directory (french.apkg in the previous example). This file is a valid Anki package like the ones you can download from the Anki website.
To import your flashcards, open Anki without option to load your main collection. From the main screen, use the "Import file" button to load the file french.apkg into Anki.
Note that when importing an archive, Anki expects the archive to be self-containing. For example, if you have generated flashcards using the note type Basic, Anki will recreate a new type Basic-XXXX when importing the archive. You may have to do post-processing as illustrated in the following video:
Next Step
The next step for you is to find something to learn that requires automation. Don’t create too many flashcards if you are not sure to review them. Observing the number of cards to review increasing with time is the best way to completely stop using Anki. Learn what is interesting you the most at the present moment. And repeat.

About the author
Julien Sobczak works as a software developer for Scaleway, a French cloud provider. He is a passionate reader who likes to see the world differently to measure the extent of his ignorance. His main areas of interest are productivity (doing less and better), human potential, and everything that contributes in being a better person (including a better dad and a better developer).
Read Full Profile